A couple of elements solved here. The banding on his left arm is the second attempt, as the first failed because I tried to make the square links out of wire.This was too thick and instead of using a thinner gauge, I made things easy for myself by finding something already square - an Evergreen square section tube, from which perfect squares could be cut at will. Some initial vein and pustule work is also visible as well as those creepy eyes and long re-entering belly growth.
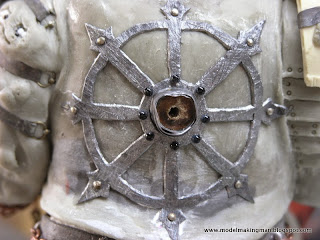
Mention has been made of the Nurgle icon with its three circles (sometimes they are three skulls, faces in torment or just horrible eyes), but I followed the painting's simpler circular form and made it with styrene plastic, putty and lead solder. You can see more clearly the hanging leather loin cloth, chain mail and waist chain belt, as well the spiked shin guards or greeves. This picture also shows where Ferropre and Apoxie Sculpt have been used.
Now that the belly work has been done, the axe can be attached by the arm wires being wrapped tightly around the haft and glued in place. Over the attachment points, the hands are modelled. Any art teacher will tell you how important it is to render hands well and how difficult it is to do. Apart from eyes, hands are the things we use and are aware of the most in our human lives. They are even harder to render when they have to be 3D. Remember, someone will always try to look at the bits underneath things to see if the artist has been slack. I do, don't you?
"Oh my god, he's got an axe!" Yes he does and doesn't he look pleased? At this stage, I finally could say that I had done what I started out to do, that is, model an imposing figure. Even though there is an enormous amount to accomplish in order to emulate the A.Smith painting, nobody in the Warhammer world could mistake this bloke for anything other than an agent of Chaos and especially, Nurgle.
More detail is added to the hands using that wonderful stuff, lead sheet.( I paid particular attention when I used it, washing my hands frequently.) Again you can see the white deposit called chlorosis, which appears when an accelerator is used with super glue. Super glue is quite easy to buy but when you find a source for a Kicker or accelerator, jump on it and buy enough for a year!
The left arm nearing completion with wrapped chain, pustules, spikes and flat things attached under the skin. I forgot to mention the crazy little finger that has turned into a tentacle -Nurgle loves a good tentacle.
The pauldron has had a bit of work with some spikes, rings and , for the first time, a departure from the original picture, an added skull. Why you ask? Well, I had an extra so I just stuck it on, you can never have too many I say.

Not so impressive from the back is he? The only back elements visible in the painting are the hairy cloak and the trophy rack, so much must be done with these at least, before any other details can be devised. Other areas of promise are the back of the pauldron and the back of the axe.
The cloak was a real problem, because on closer examination of the painting, it is seen blowing away to the figure's left, and I had only been considering the upright hair that seems to be a signature Adrian Smith device in all of his "wild warrior type paintings. This mistaken 'upright hairiness' led me to think that I could use fake fur, treated in some fashion as to show this quality. How wrong I was!
The trophy rack I had, but where it had to be placed was too large an area just with the rack. I needed something to cover the whole back, be appropriate and even play a part in the mounting of the rack. What better than the overall symbol for Chaos, the 8 pointed star. This device is present in various forms in any Chaos army and on the body of any Chaos follower. It is one of the smaller details seen on the front of the figure but it hasn't shown up in any picture yet. A large sheet of lead was pounded and prepared, then laboriously cut out to make the star, with a hole centre punched to accommodate a piece of dowel that had been glued into the middle of the back.
This is an interesting image in that it shows a fly detail on the back of the pauldron. Nothing wrong with the fly as a Nurgle image, in fact the fly IS the image of Nurgle and all followers of the god of disease usually dissolve into a cloud of flies when backed into a tight situation such as imminent death. It just didn't seem to work here, maybe I should have added some more, especially another two to make up the obligatory triangle or something. I did change it as you will see later.
Some base work next.


No comments:
Post a Comment