Friday, 25 January 2013

Modelling Festerheart Part 5


A couple of  elements solved here. The banding on his left arm is the second attempt, as the first failed because I tried to make the square links out of wire.This was too thick and instead of using a  thinner gauge, I made things easy for myself by finding something already square - an Evergreen square section tube, from which perfect squares could be cut at will. Some initial vein and pustule work is also visible as well as those creepy eyes and long re-entering belly growth.


Mention has been made of the Nurgle icon with its three circles (sometimes they are three skulls, faces in torment or just horrible eyes), but I followed the painting's simpler circular form and made it with styrene plastic, putty and lead solder. You can see more clearly the hanging leather loin cloth, chain mail and waist chain belt, as well the spiked shin guards or greeves. This picture also shows where Ferropre and Apoxie Sculpt have been used.


Now that the belly work has been done, the axe can be attached by the arm wires being wrapped tightly around the haft and glued in place. Over the attachment points, the hands are modelled. Any art teacher will tell you how important it is to render hands well and how difficult it is to do. Apart from eyes, hands are the things we use and are aware of the most in our human lives. They are even harder to render when they have to be 3D. Remember, someone will always try to look at the bits underneath things to see if the artist has been slack. I do, don't you?
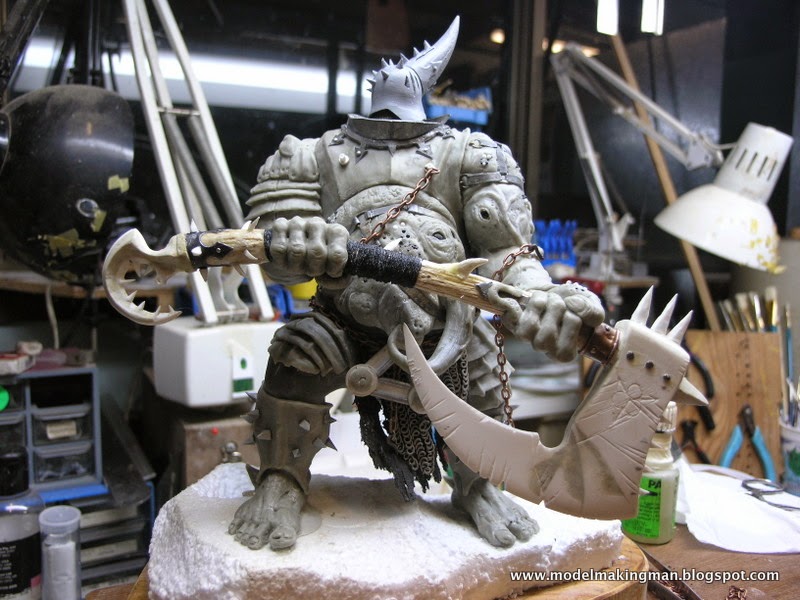

"Oh my god, he's got an axe!" Yes he does and doesn't he look pleased? At this stage, I finally could say that I had done what I started out to do, that is, model an imposing figure. Even though there is an enormous amount to accomplish in order to emulate the A.Smith painting, nobody in the Warhammer world could mistake this bloke for anything other than an agent of Chaos and especially, Nurgle.


More detail is added to the hands using that wonderful stuff, lead sheet.( I paid particular attention when I used it, washing my hands frequently.) Again you can see the white deposit  called chlorosis, which appears when an accelerator is used with super glue. Super glue is quite easy to buy but when you find a source for a Kicker or accelerator, jump on it and buy enough for a year!


The left arm nearing completion with wrapped chain, pustules, spikes and flat things attached under the skin. I forgot to mention the crazy little finger that has turned into a tentacle -Nurgle loves a good tentacle.


The pauldron has had a bit of work with some spikes, rings and , for the first time, a departure from the original picture, an added skull. Why you ask? Well, I had an extra so I just stuck it on, you can never  have too many I say.


Here are some views we haven't seen so far and they are valuable in teaching the lesson that sculpture is 3D, and you neglect this fact at your peril. Keep looking at your work from all angles, and to do this the base and figure must be able to be rotated many times without fear of damaging it. This is why my initial armatures and bases and connections to those bases, are so strong.


Not so impressive from the back is he? The only back elements visible  in the painting are the hairy cloak and the trophy rack, so much must be done with these at least, before any other details can be devised. Other areas of promise are the back of the pauldron and the back of the axe.
The cloak was a real problem, because on closer examination of the painting, it is seen blowing away to the figure's left, and I had only been considering the upright hair that seems to be a signature Adrian Smith device in all of his "wild warrior type paintings. This mistaken 'upright hairiness' led me to think that I could use fake fur, treated in some fashion as to show this quality. How wrong I was!


The trophy rack I had, but where it had to be placed was too large an area just with the rack. I needed something to cover the whole back, be appropriate and even play a part in the mounting of the rack. What better than the overall symbol for Chaos, the 8 pointed star. This device is present in various forms in any Chaos army and on the body of any Chaos follower. It is one of the smaller details seen on the front of the figure but it hasn't shown up in any picture yet. A large sheet of lead was pounded and prepared, then laboriously cut out to make the star, with a hole centre punched to accommodate a piece of dowel that had been glued into the middle of the back.


Here is a page of images of icons of Chaos and the one immediately above the centre of the rack is the one I copied. I needed something to cover the screw that would attach the rack to the star's centre and it would help if this cover could also sell the Nurgle story. I think it succeeded and at the same time I added a small triple of circles to a knee guard - you can never have enough detail in this world, a minimalist would have a fit!


This is an interesting image in that it shows a fly detail on the back of the pauldron. Nothing wrong with the fly as a Nurgle image, in fact the fly IS the image of Nurgle and all followers of the god of  disease usually dissolve into a cloud of flies when backed into a tight situation such as imminent death. It just didn't seem to work here, maybe I should have added some more, especially another two to make up the obligatory triangle or something. I did change it as you will see later.

Some base work next.


Wednesday, 23 January 2013

Korpus Festerheart Part 4


We now start to see the figure more fully, with arms bulked up by Ferropre. The hands are rarely modelled as part of the arms but usually as part of what they are holding, in this case the axe. Because the axe will be held in front of the belly, the belly details must be finished before any hand work is undertaken. It is a real problem to get the order of the modelling tasks sorted out. Other non related bits, such as the trophy rack can now be started. This is the main element of the figure's back that is visible in the painting and my interpretation of it is based on the idea of a devotee of Nurgle, who's number is always three.


I made a mistake in building the rack like this even though I like it. It answers all the triple Nurgley questions, allowed itself to be attached in a sensible fashion (if a three pronged tree branch festooned with human heads can be called sensible) and was quite simple to make. The thing I didn't see until too late was the other branch tip just protruding through the centre of the hook attached to the shoulder guard. However it should have been, I used balsa, lead sheet and that hard grey "spike" plastic, to come up with my trophy rack.


This picture shows the real start of the modelling of the final look. The belt is thick lead sheet and the armour and codpiece of are Apoxie Sculpt. I don't know whether old Korpus was this well endowed, but I have always modelled the cockpit of an aeroplane even if it were never visible once the canopy was down. Who knows if those judges look up a model's skirt or not?


An update picture showing all the finished bits. The axe is held on with Bluetack, as was the trophy rack, but the cauldron spike is in place and the whole thing is going well.


There are at least seven decapitated human heads in the painting, who knows how many more on the back? This necessitated casting from a master and manipulating the resin while soft to achieve a number of different looks. In the above picture, the masters are of Apoxie and are mounted on a support rod each while the copies are lighter. The blue stuff is a French product called Gedeo Siligum, which comes in two containers - one white, the other blue. Both are soft, rubbery, non sticky materials and you simply mix equal amounts until the colour is uniform. Into this you press your master, wait a few minutes and when the stuff feels firm, remove the master. I did this as well as using the pink two part mold and thus had more than enough heads. The pink molds are there to show the cut grooves for resin entry and air exit, as well as a new casting on the left and the master on the right. On the top of the spike is a scratch built head armature which will be built up to match the casts.


Pretty they aren't, but very necessary. The one on the right is as it came out of the mold, while the others  have had things done to them while the resin was soft. I was thinking ahead (joke) and wrapped them with copper wire so that I would have a method securing them to the rack. Nurgle, being the chaos god of Disease, would appreciate the use of the black and white micro balls which look just like buboes, boils and skin eruptions. I found these when a foam rubber toy Stegosaurus split and spewed them all over the floor --they looked interesting and were immediately collected and stored.

 As the modelling progressed, more detail was added such as the use of a large squared off syringe  tip to impress into the putty as rivet heads at the margins of the armour plates.

 Knee protectors came next, all spiked up as usual and with a border of thin solder to give that degree of 3D that you need to show.
 

At last a piece that looks human! Well maybe he was human once before he was blessed with the deadly kiss of Nurgle. Five toes even, but  is that a spike growing out of his ankle? Too right and there's more of those to come.

Back to the top and you can see the battle damage on the spike as well as the finished unfortunate head impaled on the rack's spike.


By this stage I was really going for it and the photos were not being taken as frequently. There has been a great deal of work done here on the belly and I think it is the most important part of this particular model. This really sums up what Nurgle is all about -the bloated, infected and gross deformities that infect his servants but which don't kill them. The bulging belly has to be restrained with a strap, chain and hook. There are eyes imbedded in it and elephantine growths extending from it, and all over are the pustules and bulges of unnatural decay. It really was fun to model all this stuff using a silicon tipped brush to make subtle grooves, folds and holes. The eyes were glass Teddy Bear eyes you can buy at Spotlight,(sewing materials shop).


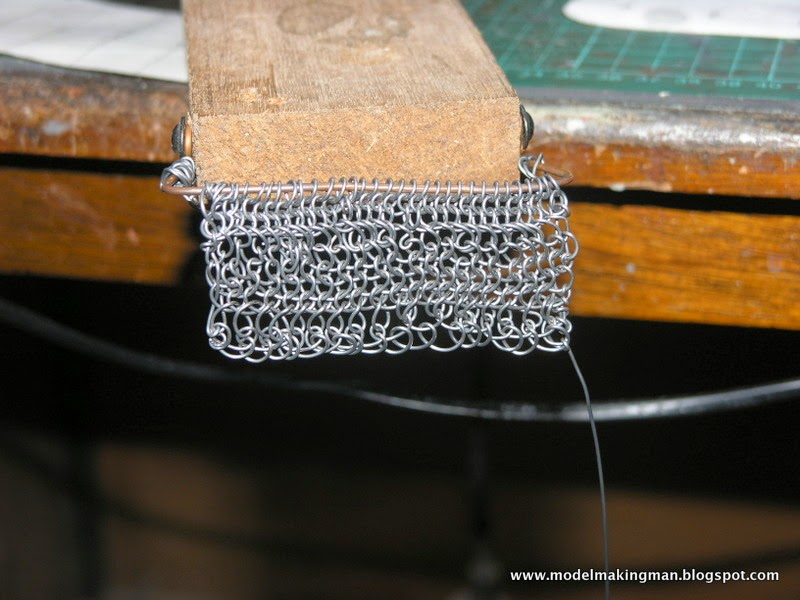
You can see now how not attaching the axe and hands has allowed the front of the figure to develop. Below the belly is a belt, attached to which is the triple circled icon of Nurgle hanging over a chain mail and skin lap lap. The chain mail was made of looped fine solder, coiled around a skewer, pulled off and flattened in vertical rows. In there is a chain with a hook stabbed through the hanging skin lap lap. The skin was a piece of really old leather I had soaked in boiling water, hammered on an anvil until thin and holed and then cut to size and glued in place. I had become obsessed with emulating every skerrick of detail that I could see in the painting - there is a lot going on in an Adrian Smith painting.
By now the figure was in place, screwed securely onto its base, with both feet modelled around the attachment points as if he had walked up to the top of a hill. The greeves or leg protectors were in place  nicely decked out with their due complement of spikes.


Next entry -- buckles, boils and hands.


Tuesday, 22 January 2013

Korpus Festerheart Part 3


The armature gains its first layers of epoxy putty (Apoxie Sculpt) and this is applied in sections as it is a 2 part formula and you really can't have too much mixed at one time. Physically, the mixing is dead boring (2 full minutes is recommended) and really it almost makes you careful as to where and how you apply it, so I don't mind the slow pace. In the end, I know the stuff will be rock hard and as it gives you a good hour's workability, the final result is entirely up to you. Other materials such as resin, paint, varnish and certain glues, always find a way to surprise (read disappoint) me in that they don't end up the way I intended.


This is an attempt to model the area of chain mail around his neck. It started off quite well and then I lost my way. I couldn't keep the same look in the reverse direction and gradually the weaving  started to look like a spider's web  after a caffein jag, so I abandoned the thin solder knitting for the tried and true 'chain mail impression method used in 54mm military figure modelling.


A thin tube, ( in the aforementioned 54mm figure, a syringe ground down to half its diameter, but in my larger scale, a 2mm brass tube), was used to make a series of repeated curved impressions for a full circuit of the neck. Under them, in a reversed curve, another line was made. This continued until a sufficient area had been covered. The effect is quite like ch'mail and careful painting will reinforce the effect later on.

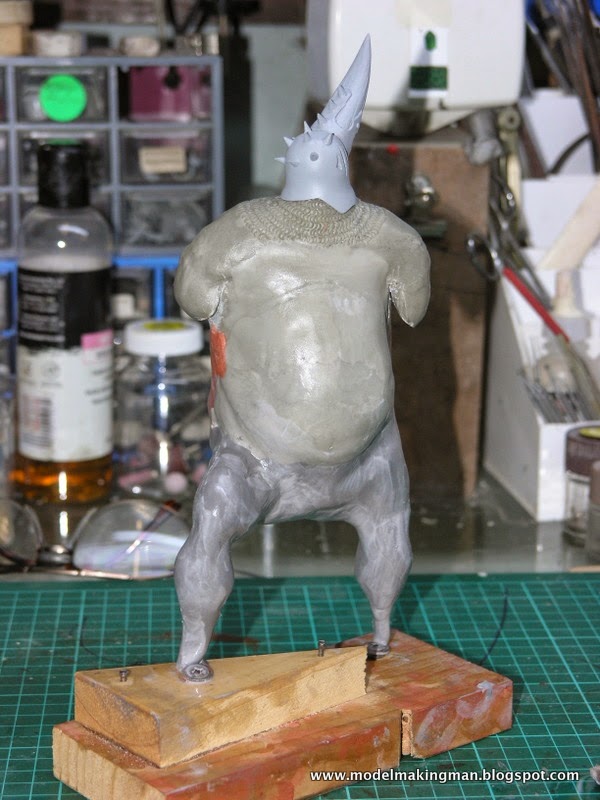
Because I am always looking for cheaper materials that will do the same job, I used an epoxy putty called Ferropre (the one you have to mix underwater), as the area to be covered on the figure , even before any detail could be added, was rather large. Especially around the legs there was a lot of flesh to build up so a big gob of Ferropre was mixed and applied. It did a great job, spread easily, formed a bit of muscle mass, but it slumped! I had to coax it to stay where I wanted it and finally this upside down pose dealt with the 'slumpy' problem.


At last fully covered and ready for some detail. The two colours are the different epoxies, the darker being the Ferropre. You can see the bloated Nurgle belly that the original ogre armature gave and even the raised R.leg suited the feel of the original painting. As this figure stands 23cm tall and has taken on quite a bit of weight with more to come, I made sure that it was firmly anchored to the temporary base with screws through bent loops of the protruding leg wires. Armatures can always be too long in the limbs but never too short.


In this closeup of the painting you can see all the individual bits that have to be modelled, just to fill the chest area alone. Each presents its own problem-- how do I make that gorget,what materials will do the job, have I got something that looks like a spiky wheel, a dissected finger  and what about those rope connector doodads? All the time I'm asking these questions, I keep seeing that signature Adrian Smith -wild man- bearskin- hair erupting over the back. It will pose a problem for sure.


Lead sheet to the rescue! This is thicker and came off a friend's roof as flashing and required a bit of bashing on my railway line anvil (also from the same friend). Also at this stage another layer of epoxy has been added to build up the chest armour. I remember those subtle ridges in the armour as being quite troublesome, but they are important in defining where things go and how the final painting will be affected.
 

Again with the arrowheads! Of course they have to have studs in them but cut off straight pins do the job admirably. All these different materials are glued with CA or super glue. 5minute Araldite could also do the job but CA is still the most effective and the quickest when an accelerator is employed as well.


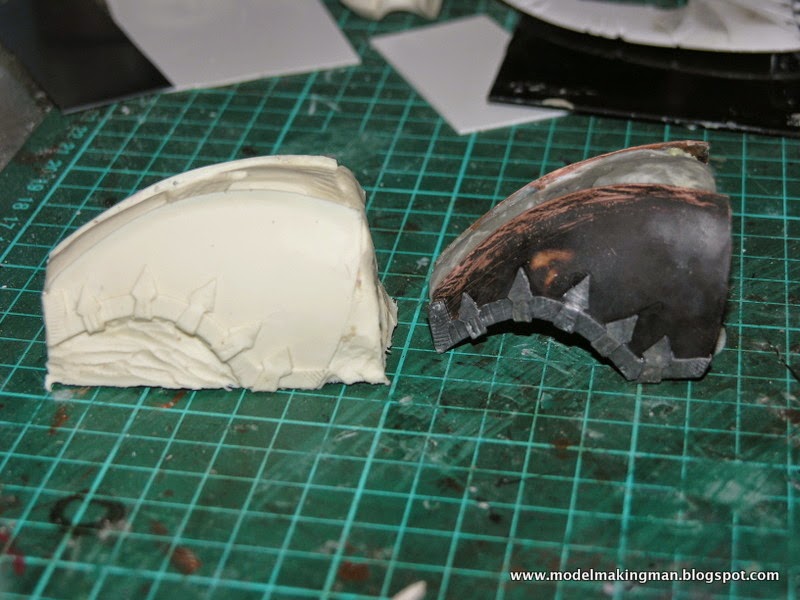
When the resin items had cured they were joined to make the full pauldron, much lighter and stronger than the original masters. The arrows came out well I think and the different levels are definitely there.


A minor diversion now to the base. I used a piece of 19mm radiata pine cut in a pleasing irregular shape and covered with thick polystyrene (the packing stuff). Imbedded strongly in this are two large dowel plugs, positioned to accept the feet wires. The thickness of the foam allowed the different heights of the feet to remain. I can't remember what the third hole was for - maybe another idea that didn't make the grade.


What a figure he cuts! All the bits made so far are assembled with arms even! Really this is mainly to convince me that progress is being made, too bad I forget to attach the pauldron.


Monday, 21 January 2013

Modelling Korpus Part2


The axe is  finished but I need another of those hooked ends for the right shoulder, so casting it seems logical, if a little fiddly-- that's what I was trying to avoid, not having to scratch build another--oh well. The part had to be half buried in plasticine, boxed up and covered with a layer of silicon rubber. This picture shows that the plasticine has been removed and the second half  ready to be poured. Note the supports necessary to keep everything steady and square while the rubber sets.


A complete  casting with the hook still in position in one half of the hold. You can see the thickened end where the resin was poured and the extended tip where the air escapes. At this stage the resin is very soft and can be manipulated to a certain extent (as I did with one of these castings to make a sword handle for the model's back).


Here we have the two hooks, a bi-cloured original and its cast clone, all cleaned up ready to be mounted on the shoulder guard. This guard is a major part of the model and  carries many elements, one being a large upright spike. I first intended to make this in balsa (as you see above), but on closer examination of the painting, I noticed it was more angular and so used a block of very hard grey plastic which was able to be ground on a sanding machine. The result is on the left and, even in this photo, looks much harder and sharper than the balsa one beside it.


The guard was basically three pieces, two curved sides and a mid section that separated them. I had some quite heavy gauge copper sheet (from a large plant pot), and decided to use it because I would be able to get the necessary curves in the sides. To do this I used the top of a cold chisel (slightly rounded) and tapped repeatedly onto the copper  resting on a thick piece of balsa. This soft but firm substrate allowed the chisel's rounded form to gently curve the metal----cool, it worked!


Here are the three parts held together with super glue-- note the white chlorosis that occurs when an accelerator is used with the CA glue. The middle section was made with lead sheet as it is more malleable than the copper and this section had to be at a specific distance from the top of the sides to allow ridges to  form on the top surface. I needed to be able to bend the sides in or out to match the shoulder width of the torso and a flexible lead join worked well. 

 
At this stage the guard's top  has been covered by a layer of Kneadit, cured in a turbo oven and sanded to the final levels with ridges on top and a solid plug of epoxy at the smaller end to allow the hook to be mounted. I still had to apply the arrow head decoration, the top spike, a flayed skin face and stuff that would appear on the rear surface, along with some other structures and more smaller spikes. This was just one element of a much bigger build --what had I let myself in for?


This is where I was so far. I had a workable body, a complete axe, a  lovely off centre helmet (undercoated to help fill the resin holes), a cast second hook, a semi-finished  shoulder guard and spike --now to those arrow heads.


The decoration was more than just one layer of spikes. It had a degree of bas relief about it, in that the actual arrow was on top of a carrier strip. This suited me because I hate a flat surface,- bumps, dings, lumps, I love'em. Lead sheet again to the rescue and as you can see on the axe, it is really easy to make follow any curve.


Once all the flat decoration was on , I realised that this copper guard was very heavy but fragile. How to unify and lighten a piece? It became another candidate for the pink stuff and had to be boxed up, but this time the shape leant itself to a single piece mold, much simpler.  


I have mentioned that molds have to be supported so that the silicon and resin  can flow evenly etc etc. Just look at this arrangement that allows a filled mold to have part of its volume replaced by a shaped piece of balsa and thus create a hollow form. The real guard would have to fit over a shoulder and so does this one. I needed it to be as thin walled as possible without sacrificing strength. I part filled the mold with resin, then forced the plug into the liquid until it came up to the top- a bit hit and miss but resin goes off pretty quickly in our temperatures so I had to wing it.


Here we see the raw guard and the master from which it was made. This is not a waste of time as two of these could make a space marine's pauldrons with a bit of grinding and embellishing --better than starting from scratch. These needed to be thinned considerably but a Dremel tool does that work very well -- CAUTION   resin dust is no good for the lungs so, mask, ventilation and care.


On this note I will finish this entry with a nicely thinned pauldron fitting on to the Nurgle champion who looks like he's had a bit of work done. Next time, the body.