Saturday, 2 February 2013

Modelling the Mega Mek Ork Part 1


This is the model I call the giant Mega Ork Mek which was purchased by a friend of mine  for his shop, as a centre piece and focus point. It is large - it weighs 5kg and is about 50cm across the arms. The inspiration came from the specialist game in the Games Workshop world, "Inquisitor", where there are characters called Chrono gladiators (humans with mechanically enhanced bodies), who fight all comers    until they run out of time, (something like that). I saw a picture of one of these called Krash Krieger, and decided to do him as an Ork instead.


The first thing I had to do was get the dimensions of a basic ork and transpose them to a plan from which all the other parts could be gauged. Once the proportions of the ork were  correct, then an armature could be made in wire.


Here we see the armature against the full sized plans, both front on and side views. I photographed the miniature from all angles and enlarged them to the correct size so that it is simply a matter of transferring dimensions from plan to model when making any part.


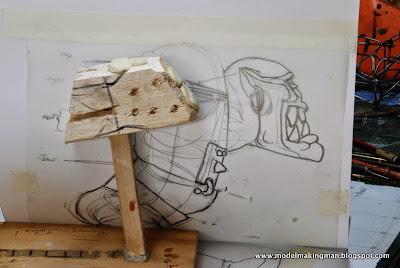
The head is the most vital part to get correct and the enlarged photos were a big help in such a detailed area. I started with a block of balsa mounted on a stick and basically roughed out angles that conform to an ork's physiognomy. That strongly jutting, chinless lower jaw dominates the side view as well as the huge area of mouth. The holes in the balsa allow any putty to be 'keyed' into the base material -it gets a better grip.


At the time I was building this model, I had not started to use Apoxie Sculpt  and the material I preferred was Sculpey. This is wonderful to model with but does require heating to make it hard. On such a large build as this one, the heat source had to be something other than the kitchen oven, but I had  a paint stripper heat gun that, with careful use, would do the trick.  You can heat parts a number of times, just to harden them and allow more work to be carried out, but this tends to make the surface brittle so judicious use was made of it. Too hot for too long and the surface blistered and bubbled.


After quite a bit of modelling had gone on, we come to this state of the head. The block of balsa still at the back of the head will be the strong junction with the wire armature and the deep groove visible fits over one of the wires and is pinned, glued or wired in place.

 
I usually use aluminium foil to bulk up my armatures. It is available, cheap, easily manipulated and can go quite a way in setting up the musculature and body contours as well. Great stuff! With the use of a hot glue gun and a small hammer, the stuff even stays where it's put - always a good thing


The moment of truth - head attachment time. At this point it seems a little top heavy but remember that the head has all its flesh whereas the body has yet to receive its layers of Sculpey, let alone muscles, skin and clothes, weapons and grime.


Orks don't have much in the way of good posture and are rather hunched, muscle bound creatures, so I needed to add a large shoulder and back piece. This was done in one hit with a block of balsa attached at the top. It could have been done in foil, but I think I chose one block as it could have had a function when some of the mechanical superstructure was to be added later.


So far we have seen the use of wire and foil, to bulk out the body. Now it is the turn of Celluclay, a type of instant papier mache, most often used to make groundwork for military dioramas. This covers the whole body, except the head, and prepares the surface for its layers of Sculpey. By using such a homogenious and well covering material as this, any highs or lows in the foil layer can be smoothed out and, most importantly, less of the expensive Sculpey, needs to be used. The rule seems to be - inside layers cheap, getting more expensive, until the real surface is rendered in the best stuff you can afford. You get what you pay for! (Yes I was making a dinosaur, the same way, at the same time )

Next entry, we will get mechanical!


Monday, 28 January 2013

Modelling Festerheart Part 7( Conclusion)


The finishing touches had to be made to the build and this entry will round off the whole deal. This  shot shows the fly image gone and a skull imbedded in its place along with a mass of pustules. You can see the small screw that holds the cloak and also another skull with chains threaded through its eye sockets, on the left. I had the problem of how to support the cloak and this is my solution. The fringe of stiff hair satisfies the view of hair we see in the painting, even though it is now not part of the cloak.


Now you can see the whole support system with the chains from the last skull connecting to bones laced through the cloak lower down. The top screw is still visible but will be covered by more tufts of hair added randomly to barer areas of the back. Those dead heads are still swinging wide and their wire ties will later be changed to thread.


This pic shows a few disgusting aspects of our friend -numerous sites of infection, swellings, tentacular growths and very painful looking piercings. My painting scheme is basically greens and browns with flesh areas as sickly, pale and intestinal as possible. Metal areas are rusted as this is the diseased state of steel.


The new coloured flies are in place and when finally glued, try to give the impression of all, just in the act of taking off. These are the three smaller ones, the larger being placed on the other side for some 'Dipteric ' balance. (Diptera - the group of insects that includes flies taxonomically)


What went on the base was always a problem as I really had no specific idea in mind. I know I wanted to give the impression of ground that had become diseased as the monster passed over it, and so used stuff that you wouldn't expect to see on healthy earth. The round balls in the middle are polystyrene chunks crushed until the pill like structure broke free. These are randomly sized and when glued haphazardly represent unnatural growths of rot and fungi quite well. Numerous broken twigs are bromeliad roots which we have in abundance, but which are strange looking enough to serve in a  multitude of ways. I used a product called Realistic Water, (obviously for modelling water in many forms) to coat things on the whole model to make them look slimy, this included parts of the base as well as Festerheart's skin, especially those diseased swellings.


Here's a look at the back of the axe and behind his knee. The axe would never have been cleaned, so as well as rust, battle damage and age, there would have been an awful lot of dried blood and guts visible. I think I can see a bit of old skin stuck there, I wonder whose? The knee area has had the micro ball treatment and is excessively pussy and painful looking, I hope.


Well, that's the build and here it is on the table, in the Open Category of the Golden Daemon, Sydney 2012. The red book in front is a photographic record of the build to prove that it was a scratch build  and that it was mine.


Finished at last!


Saturday, 26 January 2013

Festerheart Part 6


The polystyrene was covered with a layer of casting plaster mixed up with  random pebbles, bromeliad roots and anything else I could find that I reckoned would make for interesting textures. It was a trifle hit and miss but really the painting gets a bit wispy at the base so no harm done. I did add some Apoxie tentacles and imbedded them strongly into the plaster on the figure's right.


Every great Nurgle lord needs an entourage of Nurglings - lesser nurgly daemons that are really just cannon fodder unless in overwhelming numbers - and this little guy gets to have pride of place at his master's feet. Many Nurgle creatures only have one eye, I don't know why it swallowed the fly. (Oh my god, too much influence from a 3yr old grandson)


At the other end of the base is a construct of the dribbly remains from a resin pour and an Apoxie tube worm. Following the philosophy of never throwing anything out, I always look at any bit of stuff that comes my way and ask if it could have a place in the great scheme of things, and the answer is usually, yes, of course it could. When you pour resin into a mold, there is always an amount left and this can be encouraged into some amazing shapes, especially by inverting the cup and pulling strands, letting gravity do something useful for a change.


Festerheart really isn't a nice guy and his taste in personal adornment tends to the cannibalistic. These flayed faces were made with Greenstuff (another 2 part epoxy putty) which lends itself to fine detail and use in thin sheets. I tried to be accurate with the attachment of the skins and cut brass pins down to a few mm. for use as pegs or nails.


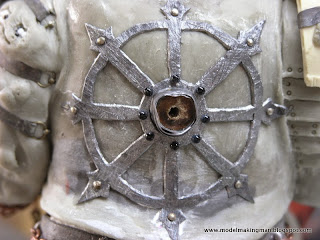
You can see them better in this pic as well as other details of the chest area. The aforementioned star of Chaos is there (quite fiddly, to make with added spokes and arrowheads), as well as cords with their clamps, a strange spiked device and some cool attachment pieces. When something as simple as a thing to tie a chain or rope to, is made properly i.e. IT WORKS! then this modelling gig really becomes fun.

You can become so sick of the sight of what you are making that continuing is painful, hence so many "works in progress" owned by modellers. Lucky for me I am easily impressed by the simplest of successes.


Here are some of the heads attached with thin copper wire and although they looked okay I eventually changed the wire to thread, as they "hung" better. The wire just didn't give the impression of weight which is so important in the modelling world, where we are dealing with quite light materials but want to represent things that may be amazingly massive - I'd say old Korpus wouldn't be any sort of  lightweight.


My biggest problem in the whole build was the cloak and this shows the first attempt using fake fur. As
it came, it was too soft looking and gentle. Something had to change its textural appearance so I singed it with a lighter, just frizzing the synthetic fur until it took on the above look. All well and good I thought, but as with the "hanging" problems of the heads, it just didn't flow as the wind blown cloak of the painting did. A major change had to take place but it happened quite a while later. Some things are so daunting that it's best to have  a bit of a holiday from them - hence the foray into the flies.


The painting shows some Nurgle flies hovering around the base (anywhere a Nurgle lord walks becomes a disease ridden dung heap and of course there you find flies). This is the earliest photo of their build, but a thick aluminium wire was wrapped with three thinner wires and the body modelled with Apoxie.


The wings were made by bending guitar string wire into the correct shape, then laying them between two sheets of tissue paper soaked in PVA glue and leaving them overnight to dry. The straighter of the two wires was left longer and it is inserted into the cured body and super glued in place.


One set of legs was left longer than the others as it was similarly used as the glueing attachment.The eyes were made the same way I make large rivets, that is by bringing a plastic rod close to a candle flame, waiting for the plastic to heat and"dome", then squeezing the soft plastic to a lenticular shape. When cold and hard, the eye is cut off the rod and the procedure repeated until you have more than needed, so the best matched pairs could be chosen. The proboscis was carved out of that hard grey plastic that is so handy, drilled, pinned and glued in place. I went to the trouble of individually placing tiny wire hairs into some fresh Apoxie on the thorax.


Voila! A finished, painted and thoroughly evil septic green Nurgle fly, too bad I decided both the colour and size were wrong - fool! I ended up making another three of the things, but I still have the originals which could make a vignette with them harassing some poor creatures.


Here are my notes outlining the building stages, as it had been awhile since the originals were made.


The final colour scheme changed to a sickly grey maggoty colour because the WHOLE model was repainted for the Golden Daemon 2012 - this happened over about 9months and I will probably not be doing something as crazy for a long time. ( Sez he.)


Lead sheet was wrapped around the pine base board as I wanted it to be more than just a base
. I used thick lead so that I could incise the monster's name into it with a V-groove lino cutting tool.


The time had come to confront the problem of the cloak and the only way I could see of doing it was to basically mould one. I had to have a form over which I could lay some stuff, be it fabric, paper or putty -at this stage I was willing to try a number of materials. The form had to be big enough to cover the area across his back, down to near ground level and all the way out to the right side as you look at it.

It had to be quite large in surface area but  also deep enough that a change in level could be factored into the flow of the cloak - these height differences stop things from appearing flat and 2D.
It was made of casting plaster, cheap, easy to carve when "green" and robust enough to stand up to some vigorous use. The above is the final carved form and all I had to do was wait until it was dry, in the meantime trying to find a suitable material to coat it with.


I settled, not surprisingly, on a thin layer of Apoxie Sculpt which was rolled out on a powder covered board with a gal. pipe roller - nice and heavy. As this putty gives you about an hour's working time, I was able to coax it into position, tear holes where I wanted them and think about how I was going to attach it and where. After curing over night, I found it to be quite fragile and in need of reinforcement. Super glue was spread all over it, both sides (what fun that was), and then I remembered some thin Japanese paper a friend of mine had given me. She is always looking for stuff I could use and like I've said before, friends are the best!
This paper had a structure where you could see the various threads and fibres used to make it. Laid over the form and softened into the grooves with diluted PVA, the paper took on the appearance of skin with the blood vessels close to the surface - perfect for Nurgle


Here is the cloak in position, air brushed to show the folds and doing all the wafting necessary as shown in the painting. Here you can also see the attachment of the trophy rack, the ill hanging heads and the start of the Adrian Smith standing up hair.


See what I mean about those heads? All their connections had to change, but I'm happy with the cloak.




Friday, 25 January 2013

Modelling Festerheart Part 5


A couple of  elements solved here. The banding on his left arm is the second attempt, as the first failed because I tried to make the square links out of wire.This was too thick and instead of using a  thinner gauge, I made things easy for myself by finding something already square - an Evergreen square section tube, from which perfect squares could be cut at will. Some initial vein and pustule work is also visible as well as those creepy eyes and long re-entering belly growth.


Mention has been made of the Nurgle icon with its three circles (sometimes they are three skulls, faces in torment or just horrible eyes), but I followed the painting's simpler circular form and made it with styrene plastic, putty and lead solder. You can see more clearly the hanging leather loin cloth, chain mail and waist chain belt, as well the spiked shin guards or greeves. This picture also shows where Ferropre and Apoxie Sculpt have been used.


Now that the belly work has been done, the axe can be attached by the arm wires being wrapped tightly around the haft and glued in place. Over the attachment points, the hands are modelled. Any art teacher will tell you how important it is to render hands well and how difficult it is to do. Apart from eyes, hands are the things we use and are aware of the most in our human lives. They are even harder to render when they have to be 3D. Remember, someone will always try to look at the bits underneath things to see if the artist has been slack. I do, don't you?


"Oh my god, he's got an axe!" Yes he does and doesn't he look pleased? At this stage, I finally could say that I had done what I started out to do, that is, model an imposing figure. Even though there is an enormous amount to accomplish in order to emulate the A.Smith painting, nobody in the Warhammer world could mistake this bloke for anything other than an agent of Chaos and especially, Nurgle.


More detail is added to the hands using that wonderful stuff, lead sheet.( I paid particular attention when I used it, washing my hands frequently.) Again you can see the white deposit  called chlorosis, which appears when an accelerator is used with super glue. Super glue is quite easy to buy but when you find a source for a Kicker or accelerator, jump on it and buy enough for a year!


The left arm nearing completion with wrapped chain, pustules, spikes and flat things attached under the skin. I forgot to mention the crazy little finger that has turned into a tentacle -Nurgle loves a good tentacle.


The pauldron has had a bit of work with some spikes, rings and , for the first time, a departure from the original picture, an added skull. Why you ask? Well, I had an extra so I just stuck it on, you can never  have too many I say.


Here are some views we haven't seen so far and they are valuable in teaching the lesson that sculpture is 3D, and you neglect this fact at your peril. Keep looking at your work from all angles, and to do this the base and figure must be able to be rotated many times without fear of damaging it. This is why my initial armatures and bases and connections to those bases, are so strong.


Not so impressive from the back is he? The only back elements visible  in the painting are the hairy cloak and the trophy rack, so much must be done with these at least, before any other details can be devised. Other areas of promise are the back of the pauldron and the back of the axe.
The cloak was a real problem, because on closer examination of the painting, it is seen blowing away to the figure's left, and I had only been considering the upright hair that seems to be a signature Adrian Smith device in all of his "wild warrior type paintings. This mistaken 'upright hairiness' led me to think that I could use fake fur, treated in some fashion as to show this quality. How wrong I was!


The trophy rack I had, but where it had to be placed was too large an area just with the rack. I needed something to cover the whole back, be appropriate and even play a part in the mounting of the rack. What better than the overall symbol for Chaos, the 8 pointed star. This device is present in various forms in any Chaos army and on the body of any Chaos follower. It is one of the smaller details seen on the front of the figure but it hasn't shown up in any picture yet. A large sheet of lead was pounded and prepared, then laboriously cut out to make the star, with a hole centre punched to accommodate a piece of dowel that had been glued into the middle of the back.


Here is a page of images of icons of Chaos and the one immediately above the centre of the rack is the one I copied. I needed something to cover the screw that would attach the rack to the star's centre and it would help if this cover could also sell the Nurgle story. I think it succeeded and at the same time I added a small triple of circles to a knee guard - you can never have enough detail in this world, a minimalist would have a fit!


This is an interesting image in that it shows a fly detail on the back of the pauldron. Nothing wrong with the fly as a Nurgle image, in fact the fly IS the image of Nurgle and all followers of the god of  disease usually dissolve into a cloud of flies when backed into a tight situation such as imminent death. It just didn't seem to work here, maybe I should have added some more, especially another two to make up the obligatory triangle or something. I did change it as you will see later.

Some base work next.