Friday, 18 January 2013

Modelling Korpus Festerheart Part 1

This is the Adrian Smith painting of the Nurgle champion, Korpus Festerheart, which I copied  to make my entry in the Open Category of the 2012 Australian Golden Daemon competition. While it attracted lots of attention from the viewers, due to its size and complexity, it didn't make the grade in the judges' eyes. For me, the big thing was that , (a) I completed the damn thing, (b) I got it to Sydney relatively unscathed (there was a minor breakage) and (c) I have now been to a Golden Daemon comp.                  

When people see it for the first time, they usually ask either, how did I make it, what it's made of, but really they are asking - why? I was challenging myself to see if I could make a really detailed model and this picture ticks all the boxes on degree of detail I think you'd agree. The real problem was of course, the back of the figure - paintings don't usually have a back view. I thought that I'd worry about  that only  if the initial build was going well and I could see an end in view.


 I had an armature which was destined to be an ogre tyrant at one stage, but that didn't happen and so its size determined the final size of Korpus. This meant that proportional gridded drawings had to be made from the copy of the painting I had. You can see the 1:1 tracing on the left and the final sized  plan on the right. The armature was made of a wire frame bulked with wound paper and covered with Das. The shape of an ogre suited a change to a bulging champion of Nurgle, so really it was perfect.


While there are many stages in the making of any part of a model, they cannot all be shown, suffice it to say that making the axe, to the desired scale, shape and look desired, was the first hurdle to be overcome successfully. Balsa was used for the haft and various thicknesses of styrene plastic for the blade. The gap between the two sides was filled with Kneadit (a quick setting epoxy putty) and when dry, the whole was sanded to the final form.


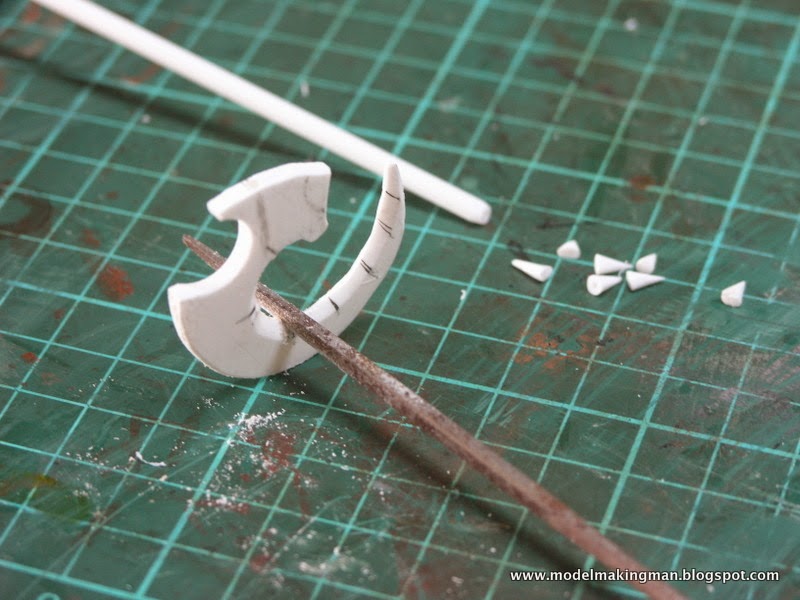
In the painting there are a number of design elements that are repeated, one of them being the hooked device on the end of the axe and the right shoulder guard. I decided to make one, then cast a couple of others, maybe to be used on the back of the figure. Thick styrene was chosen and using the score and snap method, drilling and a fret saw, the basic shape was roughed out.


Once the form was shaped in the flat plastic then Kneadit was added to both sides to give a more 3D appearance. The axe needed other details-- spurs, guards, spikes, wrapped grip, metal collar and the often repeated arrow-head decoration, which was cut from sheet lead as it is easily bent to conform with tight curves and contours, unlike the copper sheet used in the axe collar. This guard had a rolled edge and it was made by gradually bending the edge over an appropriate sized piece of wire while flat, then curving the whole unit to fit. The handle whipping is a strong thread used in saddlery and I also use it in bookbinding - doesn't everybody? 


As you can see from the painting, the monster has a peculiar asymmetric helmet with a single off- centre horn. To make this, I push-formed it by heating a sheet of styrene over a hole in a piece of plywood and when very soft, pushed a spherical peg (from  a children's game), into and through the hole. This hollow form was then filled with resin which made any subsequent shaping very easy.


Seen from the side, the helmet has an extended flange so all the material above this had to be removed and a sort of 'waist' created. Resin is the perfect material to work with when something has to be filed, drilled or ground away.*** ALWAYS USE  A MASK*** nasty stuff resin dust!


The balsa horn is attached-pinned and super glued- and the repeated motif of arrowheads in lead added. Korpus had a strange way of viewing the world in that there need to be three vertical slits in the helmet, so these were drilled and shaped with a fine Dremel bit.


The material on the left is a very hard plastic which was given to me 'Just on the off chance that you could find a use for it'. This happens a lot with my friends and the stuff is great for making sharp spikes that are so beloved of Nurgle.


I thought I'd end this first part with an overall look at my work area. You can see that while  the Korpus job was on the go, so too was the trilobite for my wife's birthday. In the centre back, the helmet is trial fitted to the Das armature which has had its first coating of Apoxie Sculpt. Those grey brushes near the black mini vice, are actually silicon tipped and are very handy when detailing epoxy. Under the desk is a hair dryer in a pvc tube and it comes in handy for many jobs, especially quick drying of paints, general blowing of stuff and hardening of epoxy.

Next time I'll get into some pink stuff-- casting!


Friday, 24 August 2012

Overview - Major models to date


Major Models

This being an overview, I decided to start at the beginning of my Warhammer based mini dioramas and this was the first.  I used the Lord of the Rings Cave Troll and the Ork war boss, Ghazghkull Thraka, switched parts around and came up with this triumphant beauty. At this stage I realised that my greatest enjoyment was in making the bases and scratch building the peripheral parts such as the banner, skull bomb etc. The banner is painted with a shark drawn by a student of mine when in Gr.4 (he got married last weekend, so it was quite a while ago). I have always kept exceptional attempts by my kids and this was a doozie. The giant skull came about because without something to hold it up, the figure's face would have been covered by the banner - this started a long line of skull use.


*************

The next dio was really ambitious and I don't  remember why it got so complex, except that I had the remaining parts from the previous models (ork war boss and troll) and they went together to make one humongous ork who demanded the power of a whole factory. The dio was called "Powa to da ork" and it won my first gong at my model club's annual competition - once they decided on a category to put me in. It used three other ork models, all operating parts of the generating equipment which fed power to the central figure on his plinth. I made a real mistake in not painting the cables before fixing them in place and there were 19 of them. A valuable lesson learned.


*************


You will notice a similarity between the black stands in these first three dio's. Because the shape of the construction above is different, the stand had to be made to mirror it . They were built as a hollow box with a similar top and bottom, central support walls and a flexible  plastic outer layer. Whatever base I created was given an appropriately shaped stand. Thank goodness I managed to go circular on No.2 at least. The dio above is called "Beware Behind" and shows an Imperial Sentinel -a manned, camouflaged walker- being stalked by three genestealers (Tyranid warriors). The"nids" have good reason to plan this ambush as the Sentinel is in the process of squashing one of their mates in that reedy pool. The third one is around the back of the cliff as I like these scenes to be "in the round". 

Each time I make a model I like to try something new or different from the last, and in this one I used rigid urethane as the cliff, fashioned a twisted tree-like growth with wire and Das, added real bromeliad roots to the main trunk and tried my hand at modelling water. Standard techniques such as cutting, pinning and repositioning plastic models were used to make them fit where I wanted them and tell the story of the action.


******************

 
This dio came about because I had made a major character - Nurgle's Huntsman-  out of  a simple plastic Space Marine. The conversion of models in the gaming world is common but to carry it out seamlessly is the trick. I lengthened the figure (they aren't very big), did a head swap, gave him larger ork arms, modelled a chain mail lap lap and the best bit, used  an upside down, hollowed out ogre's head as the shield behind his head - now a zombie's. Well, after all that and at that stage not having anybody  in the know to appreciate it as a single conversion, (no Games Workshop in Cairns), decided he needed somewhere to call home, hence dio No.4. 

 I made the castle out of casting plaster pieces poured in rough "wall" moulds -really just rectangular plastic boxes - and carved the blockwork into them with a sharpened screwdriver. The overhanging lintels were added as raw wet plaster in situ and carved quickly before drying too much, then all the pieces were assembled onto a larger plaster base, itself carved to resemble the underlying rocky landscape. Super glue was used along with some pinning, to join all the elements as well as to seal the plaster prior to painting.

As I was in the plaster mood I decided that the Huntsman needed a faithful "hound", and so carved a giant tentacled slug creature to fit under his right arm. This monster has left a slime trail leading from the portcullised entrance of the main building- portcullises take some making and I was finding that everything in this dio was challenging and that's before the painting!
Games W'Shop Zombies really got a workout on this project in that they furnished  a row of wall trophies, the support brackets for the central structure, food for the Red Terror on the right and the impaled victim on the roof. The banner is my most ambitious attempt at freehand painting in this scale and is a portrait of the GW Nurgle Prince model with the obligatory flies. This is planted through the body of the aforementioned zombie on the roof of the keep - he's a zombie, he felt nothing, - nothing.


****************


At last a change of direction, away from GW and on to a themed event in my modelling club. The theme was Movies, anything and everything. Other members got on with their Sherman tanks, Spitfires and sundry other legitimate offerings while I decided to scratch build the Reek arena beast from one of the Star Wars movies. This was built using a standard - wire framed, alfoil bulked, Das covered - method, as are most figure models. The skill is in getting the texture of the skin and any relevant facial expressions correct. Well, an angry expression and an impressed, lumpy skin did the trick but as  I wanted to enter it into the main model competition at the end of the year, I decided  to place it on a simple dioramic base evocative of its arena days. I really like this guy and looking at it reminds me of all the dinosaurs yet to be made -remember the Iguanodon scientist ?

**************


Back to GW and this really big model. Those figures are approx. 30mm and it takes a lot of them to cover this behemoth -also a hell of a surface area to paint. Why? GW released their giant Ork walker called a Stompa which sold for $160, however you could buy three 1:35 scale Tiger tank kits from a really good manufacturer for this amount (the Tiger tank is always the standard). So I made my own, saved the money but what had I bitten off?
I built the vehicle in modules - legs, hip structure, neck pod and head. This head section was once the turret of a 1:16 scale T-34 tank by Trumpeter, which I inverted so that the larger opening was at the top and would be visible when filled with stuff. Inside I used the kit's gun breech but added an ork loader, slightly confused as to ammo choice, there being piles of shells everywhere, all different. The overall colour being yellow says that this machine is owned by the "rich gits", the Bad Moon klan and their half moon symbol is visible in many places around the vehicle. Behind the large one on the top is the maniacal driver, while at the back are two gunners being directed by a small ork or "grot" wildly gesticulating on a microphone.

The neck pod is attached to the head section by the same circular connector rings as found in all tank kits. This allows me to detach the whole turret by a half turn and makes transporting the very tall model much easier. As any show or competition is at least an hour away, ease of packing is a very real issue and to be able to break down a large model is important. 

I really liked the way the hip section worked out because I had to make hemispherical forms for the leg connections and for a dirty great backwards facing gun. These tricky shapes were vac formed (heated plastic sheet sucked down over a pre-formed shape, in this case a hemisphere). My home made vac former using the household vacuum cleaner worked well and this is not usual when you make a special tool to do a specific job. What often happens is that (a) it doesn't do the job, (b) you only ever use it once and (c) you come up with a better alternative which was staring you in the face all the time.

The leg sections were relatively straight forward and made with sheet styrene, Evergreen rod and tubes and a plethora of odds and sods. Rivets cover the whole vehicle as orks are not into aerodynamics, so the lumpier the better. This suits my own philosophy well and I had a great time just sticking stuff anywhere and everywhere, the more spikes the better and don't let a surface be accused of being smooth.

When it came to basing the model, I wanted a ruined factory look- that's what orks do to factories- so I built a number of different sized I-beams out of flat styrene sheet. These, along with some perforated steel and gauze off cuts, were just built up until the model was supported by them but didn't dominate them. I had fun running lead solder lines under and through the maze of beams so that no matter where you look there is something to see. The orks are not the only creatures on this dio as I added a few of their mortal enemies, space marines! They are hidden in this view but are only a scouting party and the orks are unaware of them. That is the point of a diorama - there is always a story. 

*****************


If I thought the last model was large then I forgot the "Mega Mek Ork". I won't go into a lot of detail here about this build as it deserves an entry of its own, but the way it came about is interesting. A shop in Townsville which sold GW products wanted a large focus piece and the owner, having seen some of my entries in the model club competition, asked me if I could come up with such a piece. He initially wanted a Titan -  a gigantic walker, a God Machine - but having seen these done before, I realised that the amount of effort to do it properly would be out of the question. Think a year !

Another option, I thought, could be a Squiggoth, a huge quadrepedal, short necked, howdah backed Ork  transport lizard. On looking these up, they were all really very similar with little scope for individualism. Then I came across a character in a GW specialist game ( Inquisitor) - this game was I think, a role playing game which used 54mm figures, the standard size of military figures in most international painting competitions. The character was called Krash Krieger, a chrono gladiator. He was an amalgam of a man and machine who only stayed alive while he was fighting. So imagine a zombie- like man with huge mechanical arms and a generator on his back to power him - all the things to make me quite excited. Making the man into an ork was just a sensible decision as the Krash character and the game Inquisitor are not well known to current GW followers.

 The model is huge. It weighs 5kg and would barely make the 18x18x18 inch dimensions allowed in the Open Category of the Golden Demon competition. As I sold it to the shop, all I have is a life sized photo of it and the setup you see above is how I took those photos - seemless background, reduction of shadows etc. Before it was delivered to its final home, I entered it into my club's major competition and it won both Best of Show and People's Choice so I suppose it paid me back in kind. I do miss his smiling face though. I wonder if I should make him a mate?

********************


"Korpus Festerheart" is the name of this hideous character and is the reason I have not done any entries since May. I am entering him into the 2012 Golden Demon, Games Workshop painting competition in the Open Category (mainly because he is too big for any other). Not quite as big as the mega ork but it does weigh 2kg and is about 33cm high. It is a 3D copy of the famous Adrian Smith monochrome painting and because of this presented an obvious problem -what does the back look like?

I have seen the figure represented a number of times as a wargaming, (28mm) piece, but I hope my larger interpretation meets with approval. Once the show is over and I have him back in the cabinet with the other crazies, I will devote an entry to his build.

*******************


Friday, 18 May 2012

Jailer painted

Since the last post, Games Workshop has introduced a whole new range of paints, shades, dry compounds and glazes which are meant to supersede their existing ones. The paints are divided into Bases (equivalent to Foundations) and Layer paints, which are the standard hues used for the typical GM method of "layer" blending. Base colours are heavy in pigment and will cover even a black undercoat, while the Layer paints are graded in hue to make seamless blending easier. Shades are the same as the old Washes and with a larger range, do the job of filling the recesses and creating shadows even better. Dry compounds are a new idea to make dry brushing easier, in that they are so thick as to need very little scrubbing off to get a good effect. Glazes are also new and allow the painter to apply a basic colour (red, blue, yellow, green), to tint the main colour scheme.  
I wanted to try out these new paints, as well as presenting a "painting log", similar to 'Eavy Metal' (the GM painting team). As the Jailer was the subject of the last entry, I decided to make it the focus of my first  log. The model was first undercoated in flat black -see, the breakdown in sequence has already started- and then spray Base coated with the new colour Screamer Pink.

This was given a wash of  Reikland Fleshshade.

 
A light spray of Bestigor Flesh (this was made from the old colours of  Tanned flesh , Kommando  Khaki and Dwarf flesh ) was added from a high angle to give a highlight effect.

 
Next  the whole was washed with Athonian Camoshade. Great names aren't they?  These new  names have been a bone of contention for many, as all the old paints have their equivalents in the new system but the old names have been changed. As well as having to learn 80 new paint names, the modeller has to recognise the 60 odd new names for their old favourites. Actually that lurid pink base colour I used first was  really the old Warlock Purple.


Now the real job begins, the application of paint in "layers"of colours that create a seamless blending from dark to light. The colour here is the same Bestigor Flesh from step 3 but this time brushed onto the folds of that disgusting flesh. The areas of armour, fur and bandages will be treated separately.  

 
The differences in appearance are now more subtle as only very thin layers of paint are applied. Here the addition is made using the new Dry Compound, Underhive Ash, dry brushed lightly over the surface to lift the highlights.

 
As I had bought another Dry, I decided to lighten further with Longbeard Grey. These Dry C's leave the surface a bit uneven and "dusty" and are  more suitable for roughly textured areas like fur or groundwork.  This is where the rot sets in, and you apply something which doesn't really work as you visualised it. So what to do? 

 
Application of Washes or Shades softens the dustiness of the dry brushing so I washed with Athonian Camoshade again, this time quite diluted and see, it's dark again, damn!

 
This time I added a bit of Nurgling Green to the mix of Bestigor and layered the flesh again- but it didn't stop there. The model was Glazed with Lamentor's Yellow as an experiment to try these new tint colours and at first (wet) it looked really good, so I added some  light Pallid Wyche Flesh. When dry, however, the Lamentor's  was a bit over the top and I had to knock it back again, probably with another wash. At this stage I was only really interested in getting an acceptable result and forgot to take properly sequenced photos so the next three photos are of the finished product, set in the vastly reduced dioramic base.  


Wednesday, 25 April 2012

The Jailer

THE JAILER


This sculpt began with a request by a games player on a chat site who had found the above image and wanted help to turn it into a 3D model. By a complex chain of "someone who knew someone else", he found me. We live in different towns but he was able to visit for a day and I began to teach him my method of scratch building a figure.

 
I always start with a full sized plan however simple, so the model can be checked against it. This was the basic armature wire layout.
The shape has been fully realised and wire has been laid onto the plan and soldered- hence the scorch marks.

 
Quite a number of plans were drawn, this one showing the squaring up method for determining positioning of detail features. The wire armature can be seen with loops at waist and shoulders that allow for the thickness of the figure. (Remember, when modelling from a picture, you very rarely get a look at the back or side views, so you have to invent some workable dimensions.

 
Here is the armature bulked with alfoil.This is where a small hammer comes in handy for compressing the foil and making it stay where you put it.
For this model I used Sculpey and this is the first  piece to be added. Sculpey needs to be fresh so it is quickly made pliable and workable. I have had experience with old Sculpey and it is not so accommodating.

 
The rough blocking is complete with no detail at this stage except for the depressions  of the mouth and "chest cage". *This creature is a JAILER, and places captured victims in cages, one built  into its chest and another suspended from a hook stuck into its back!                                


Here are the first details which show the really nice way Sculpey can be worked to simulate flesh texture. Small pieces are added and blended into the landscape of the body.


I worked on the whole right arm and hand, adding lozenge shaped pieces of clay for the large muscle groups.This is my favourite part of a build - love those oversized muscles.


Constant reference to the scale plan helps keep everything on the right track.                                 


The Jailer has a belt made of chain holding up a fur wrapped around him and this was a tricky part to sculpt.You could 'carve' into a mass of clay until something like fur eventuated or you could 'grow' the fur  bit by bit . I felt this second method would result in a more realistic fur wrap in that you could see each tuft  individually and that they could even be made to overlap.


Here we see the fur making method allowing the tufts to naturally overlap the chain belt. The chain links were scratch built from aluminium wire that had been hammered square, sized around a jig and super glued. A first look at the back of the monster (helped by some internet research and an amazing 3D program called Z-Brush) and what a back it turned out to be.


The Z-Brush pictures showed that the entire back was covered with the corpses of its victims .Maybe it didn't know they were there and someone had used its back as a walking morgue?


More detail- teeth, chain links from copper wire, a chest cage (one of 5 that I made for the final diorama, skulls all over the back, a large hook and armour plates. 


What a handsome chap,no eyes, a perpetual snarl and dead things all over him.


This is the finished sculpt before painting. Bandages from masking tape strips were added to his wrist and legs, a mace for a weapon and lots of small spheres (from a foam rubber dinosaur) to add to the texture of the back. The next three pictures show the final paint job in a typical Nurgle colour scheme. The model is not a Games Workshop character but the pestilential colours of Nurgle do suit it.


Can you see the poor soldier trapped in the back cage?                                                                       


Now here is a picture that captures all that is gruesome about our world. Before the next paint job I had resprayed the Nurgle scheme an overall yuck dead flesh colour  but we happened to go away for a while and when we returned, a wasp had used the open mouth as a nest. This means of course that it had been hunting caterpillers and laid its eggs on their paralysed bodies, a ready food source for the young wasp larvae. I must have disturbed mum because this poor moth/butterfly to be, was trying to make a break for it.