Thursday, 28 November 2013

Ra Zombie from Plants vs Zombies


This poor photo is the standard cast zombie head with foil bulking and styrene plastic side wings that any "pharaoh" worth his salt wouldn't be seen without. I am making a" Plants vs Zombies",Egyptian  
for my grandson for Christmas, but this time am trying to utilise the existing moulds of the previous zombie efforts to duplicate the model for my own collection. I want one too.
The Ra figure is obviously Egyptian in appearance and has a spectacular headpiece with a Horus (falcon headed god) feature, as well as multi coloured mummy bindings and a sun sceptre. In the game, this zombie trudges in and with his sceptre, steals all the suns that your sunflowers have produced.


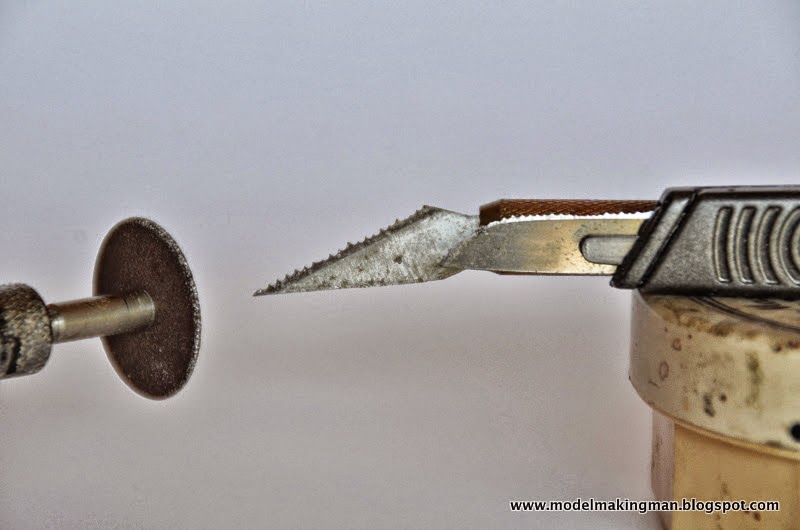
Because I wanted two of the models, I had to decide whether to make multiple masters of all the new bits or try to cast the duplicates. I chose the latter because it would be good practice at casting smaller, thinner pieces, and I had purchased this new Pinkysil Putty which is good for flat, one sided objects.
The sceptre is made up of two parts, the shaft and the sun shape. I carved a master shaft out of thick plastic sheet and with judicious drilling, sanding and filing, managed to get the tricky bent shape quite well. The sun circle was a bit of a bugger because it has 10 points and that means dividing a circle into segments of 36 degrees (not a straight forward geometric construction angle). Anyway I did it somehow even though its small size made it even trickier. The two plastic pieces were then imbedded in the putty - top photo - and on curing were filled with resin, which was put aside to cure.
The other mould and cast is the Horus 'falcon' beak which would be added to the finished helmet. This was another good use of the silicon putty. An Apoxie master beak was made and simply pushed into a blob of the soft pink stuff which was then allowed to cure, a matter of minutes only.

 
 Here we see the master head and the two casts as well as cast beaks and sceptres. The bodies are the same as previous zombies with special attention to the fitting of the' one size fits all 'legs. You can see that the casts of the sceptre shafts are surrounded by excess resin from the casting. This excess is called flash and is good to have in that you can control the finishing of the piece which is usually a sanding or filing process, without worrying if you have removed too much


The two sceptres are finished and cast in resin which makes them light but strong. All that is required now is to add a blob of Apoxie to the suns to make the raised centres.


Here is the fully cast' Ra' head which differs from the previous zombies in that it has in built eyes. I kept the eyes of the the first zombies separate so that they could be really finished smoothly and even air brushed with a gloss paint, then added at the very last minute for maximum impact. This job had so much extra detail in the head piece that I decided to fit everything at the same time. It didn't help that much and the final eyes are not as good as the first ones - a pity.
The mouth is partially hollow and requires drilling out as well as having the gums and teeth added in as before.
Where the Horus beak will go has been hollowed out to a degree to allow it to really "fit" into the helmet and not just sit on the surface.


The helmet has  its beak and some scribed eye circles as well as drilled nostrils.


Now comes the tricky bit. The hands must hold the sceptre but as the arms were cast straight they needed to be cut and realigned with elbows. A simple job using super glue and accelerator to form, not only the bond but also the filler for the joint.
The fingers were formed with sausages of putty over stubs of plastic rod fitted into drilled holes, then folded over the already in place sceptre ( it had been glued into the palm of the hand at the correct angle).
I wish I had thought of a better way of joining the sun to the shaft but at the time this seemed to do the job - I suppose it does, but it goes against the grain to cop out to such a simple junction.


Each left arm is hanging straight and so the only problem was the dreaded fingers, but the method employed was easy and looks the part.


Here is a good view of the action area, with the illustration of Ra in my notebook as well as many tools of the modeller's trade.
I must have cast a few spare legs (probably using up excess resin) and they show the flash that is caused by the resin leaking into the join between the halves of a two part mould.


Now we get to the main difference between Ra and the previous figures. Ra is mummified and so is wrapped in bandages. This photo shows the arms with their swathes of wrappings. Also in this pic you can see the centre of the sun as a raised convex disc of Apoxie Sculpt.


This is how I made the wrappings. A sausage of putty was gently rolled flat and the best roller I found was a plastic Evergreen tube. It worked really well because it did not squash the putty, just flattened it controllably until I was able to slip a knife blade under it and proceed to wrap the little man.
I like the slightly frayed edges of the "rag" and this added to the whole "old" idea which is what both pharaohs and zombies are all about.

The wrapping of the bodies proceeds and the frayed look is evident. At this point I was unaware of a big problem which only showed up when the time came to stand the figures up. They had such big heads that, with the angle of the feet as it was, you couldn't see their faces!
Something had to be done and I tried two methods, one for mine and the other for the grandson.


For mine I built a ramp so that the whole figure was tilted back without actually looking so.
The one for my grandson needed a simple flat base so the ankles had to be broken, drilled, pinned and
filled to give the correct angle for a normal zombie carriage.
I actually made a master of a flat pavement piece with a sun pattern, cast it using the Pinkysil Putty and built my ramp and his flat base with copies of the master.
This pic shows other minor details (this is quite a complex little figure). There is a small sun medallion at the throat, the gums and teeth have been added as well as two arm bands made from thin lead sheet.
The feet have had their bandages and the figures have been pinned and glued to their bases.


From this point on painting takes over. Here the figures are being undercoated in my spray booth with a cream semi gloss spray can paint. MISTAKE! The colour is alright for the subsequent light overcoats (yellows, light green-greys etc), but the type of paint actually rejected the following layers of Citadel and Vallejo acrylics I like to use.
 
 
 Masking for that tricky colour, yellow. I had decided to make his the standard yellow and orange and mine, yellow and blue. Yellow is a difficult colour to get a strong coverage and the way I do it is to airbrush thin layers with intermediate drying using a hairdryer. This builds up the layers gradually while always finishing with a smooth coating. Using a brush for whites and yellows is a sure way to drive you bonkers.


Here is that yellow(Citadel Golden Yellow) and it took quite a few sprays and dryings to build up this intensity.


The wrappings were of course three different colours - a light green grey, Slaanesh purple and  Eshin grey (I think?) A darker green grey made of a mix of Orkhide Shade and Vallejo German Camo Beige became the skin tone for both zombies.


Much masking for the Blazing Orange stripes on the side pieces of the helmet


He looks good in stripes don't you think?

 
 I like mine with the Enchanted Blue but the trickiest bit was to come. The helmet features the eyes and beak of the Egyptian god Horus and I would have liked to airbrush the blue grey facial mask which gives this figure its strength and appeal. Sad to say I couldn't find a way to mask the two sides of the face with an airbrushable transfer and so I had to do it by hand. Talk about Mister Steady Hand! It nearly beat me but those Citadel paints and a good Windsor & Newton 00 brush got me home .


The large area at the back of the head really needed something and as stripes seemed to be the in thing for zombie pharaohs, well, did I have a choice? I masked the two of them up with Tamiya yellow tape (great stuff ) and sprayed, again in thin layers, Citadel Dark Reaper. The bases were painted with a mix of browns, desert yellows and washed with Devlan Mud or its new equivalent. The armbands look good painted as if they were metallic brass still shining through the years, (Tinbitz and Auric Gold.)


Thursday, 26 September 2013

Zombie Meerkat and Panda

I have two nephews (brothers), who have birthdays very close to each other in the same month and so we tend to give them their gifts at a date between the real days. They each have a particular favourite animal  - the older one likes Pandas while the younger likes Meerkats. These animals have been the subjects of small collections over the years and so I decided to add to their numbers with a couple of special scratchbuilt models, zombie style. 

By Googling 'Zombie Pandas' and 'Zombie Meerkats' I was astounded and gratified  to see that the whole world is zombie crazy at the moment  - just goes to show you can't keep a good idea buried for ever.  This is a page from my notebook with sketches that start the process of visualising the final model.


I decided to use the previously made casts from' Plants vs Zombies', ( made for my grandson), and see if they would translate into a panda and a meerkat with a bit of muzzle addition and some ear action. As you can see from the above, the standard round zombie head, with added putty (marked in red checks), can be made to do the job as two different animals quite well. At least it looked like there wouldn't be that much extra work, until I actually got started. Always the way isn't it?


This is the panda in its raw form with special zombie' reaching' arms. The main deviation from the original z's were the arms of the two newly resurrected animals, as their attitude to z'hood is defined by what they are going to do. I decided that the panda was going on a shuffling "where bamboo?' rampage, while the meerkat was just on z.watch, waiting for the clan to arrive before hunting some poor innocent cobras or something.


Here are the moulds for the legs, eyes and arms. I decided not to use the cast arms as they did not suit the final forms I had in mind for the models. I must have had some heads and torsos already made and that did save a bit of modelling time. One of the main things about a zombie is its eyes, usually vacant and madly staring, but also often of different sizes. A panda actually has quite small eyes ( the black fur ring around them giving the impression of large size and hence "cuteness"), so I would retain the one huge bulging eye but use a smaller bead painted red for the 'real' eye. The meerkat would get both crazy eyes from the original zombie men because it looks more like a weaselly little man anyway.


Work has begun on the new boys and they do indeed look like their sketched pictures. I had to change the mouths quite a bit as the original ones just did not suit their prospective owners. There is a lot of cream coloured resin visible here but this would change and both bodies would have to be covered with  a lot of putty before the end. So much for my short cut idea.


Pandas are chubby and a newly zombified panda needs some padding in the form of an  aluminium foil body suit. I had some thinking to do about the hands so they were left till the end. The 'pigeon-toed ' stance was planned as it adds to the ridiculous nature of the whole exercise.


The bases are really one piece of plaster split in half, super glued for sealing and ground flat for stability. Making them out of the one piece sort of unified the look of the models and of the gifts in general I felt, as they would be presented at the same time, in the same box.
More of the additional putty work can be seen and the modelling of the meerkat's jaw and teeth. Also this shot shows the cast legs put to good use, remembering that it is only one basic leg, ground at different angles to fit both sides of the body.
The line on the head is the junction of two separately cast halves as the moulds didn't lend themselves to a single mould pour.


 Quite a lot of work has been done to get to this stage

. All the extra putty is on, areas of bare flesh have been ground out through the fur, the bases have been surfaced, fangs have been inserted (as well as bamboo) and claws have been glued in place.
The meerkat's head is turned to the left but his paws are in that typical, "I'm on guard and I can stay like this all day"pose.
The main thing this shot shows is the texturing that I have added to the fur.


These are the tools I used to scrape the fine lines into the putty to simulate fur. I used a thin cutting wheel in a motor tool to cut tiny teeth into two different knife blades. The rounded blade allowed me to follow contours on the models more easily.


Undercoated in all their glory but without their eyeballs which have been painted and glossed separately.


The finished models, painted ready for boxing and presentation to the boys on that 'between the actual birthday, day'. I used Citadel acrylics as well as their Shades (washes)  and made sure the bare skin was painted a suitably dead colour to contrast with natural fur colours - easy in the case of the Panda but  tough in the Meerkat. For a seemingly drab desert animal, it has a surprisingly complex coat.
I think the crazy red eye works well on the Panda don't you?


I couldn't pass the chance to put all the zombies together and here they are. Pity most of them are with a certain grandchild because they missed one hell of a party!


Thursday, 25 July 2013

Plants & Zombies


My grandson is turning 4 next month and has discovered the game Plants vs Zombies. I had mentioned to my daughter, a huge zombie fan, that I happened to have a spare set of legs (originally to be used for the Typhus model), and that maybe he would like a friendly zombie figure for his birthday. It was then I was introduced to the phenomenon that is "Plants vs Zombies. I googled the site, took photos of the images and printed out some to help with the modelling and these are the ones made so far. The zombie figures stand about 140mm tall, I'm not too sure how the others measure up in correct size relation to them, but I doubt that a 4 yr old really worries about such things. He has assured me that he knows that they are models and not toys and that he would really like to start a collection of his own. Normally this would be crazy talk for such a young kid but I know the type of household he lives in and I believe he certainly would know how to treat them.


Above are some of the pages in my sketch book which allow me to come to grips with my subjects. I was using this modelling project to practice mould making and casting in resin to a greater extent than I have before. I could see the zombies in particular have a great range of forms and I did not want to have to make totally new ones every Christmas and birthday, or for as long as the interest reigns.
This meant the modelling of certain parts of the body - a generic head, two sizes of eye, torso, a right and left arm and one dual purpose leg. I figured that casting two legs and grinding the hip area to be either right or left was easier than making two masters.


Here are the masters modelled in Apoxie Sculpt. Note the angled shoulder and hip areas and the basic form of the hands. I tried to simplify the shapes of all these masters so that any changes made later could be as painless as possible. Addition of fingers (so important in the' grasping at nothing' of a zombie) would have made the moulding very complex, as would the gums and teeth.
Once the figure was posed, the clothes had to added in their many combinations based on what character was needed, so a great deal of detailed modelling was not going to be avoided in any case.


These pictures show the masters, moulds and castings of the main parts of the zombie body against a scale for reference. My dad would have been proud of me - engineer's son and zombie maker!
Some of the moulds gave problems. The leg mould did not allow the resin to get around the ankle turn  and a cavity formed which had to be filled with putty. I did not think the large head could be done as a single item (the face had too many undercuts), so I poured it in two halves, to be joined after fully curing.
As usual with silicon moulds you can see the registration knobs/ holes and the two cuts in the rubber, one for resin, the other for air to escape.


Here are the halves of the head as well as fingers on the hands made in two different ways. They really gave me a problem as Apoxie is not that good at sticking to a skinny finger shape. I came up with about four different ways to make a zombie's finger and probably used them all.


This is what faced my wife on the dining room table the morning after - cute eh?


The joys of casting. Suddenly there's more than one! These little guys have legs joined (twisted foot and all, for one of them), gums and teeth inserted but no permanent arm poses as yet. I thought that the main clothes, shirt and jacket, would be easier to add without an arm being in the way.
The eyes, seen here with inserted wire handles, were being prepped for airbrushing after a session in a power drill spinning against sand paper to thoroughly round and smooth them. The wires were also  useful in rotating the eyes while being sprayed a nice gloss off-zombie-white.

A selection of hands with attached fingers. The first one, on the right, was pure putty and took forever - method rejected. The others are variations of plastic tubes bent in a flame and inserted onto a wire drilled into the hand. I even cut the tubes into small sections so that the curves in the fingers could be followed - third from the right. Anyway they were all used, I mean a zombie's fingers are the body parts most likely to fall off on a daily basis aren't they?


Zombies with pants and shoes as well as the first plant master, the Peashooter. As with most of the plants, this was made around an formed aluminium foil core and covered with Apoxie. I made a tool out of the same putty to impress the eyes in this plant and all the mushrooms. This repetition of eye shape really helps in unifying the group of plant models as well helping the later painting process.


What a fine body of body parts. You can see the zombie head joins as well as the bent arm, (made easy by cutting the arm at the elbow and filling the subsequent joint). Different poses are easy to achieve with a slight adjustment of where an arm or leg is attached. The large heavy heads meant that the models couldn't stand on their own two feet and they needed to be attached to a larger base - these were all made at the same time by pouring a plaster slab and dividing it between them.
In this photo can be seen two individual 'angry gourds', three cast mushrooms and three peashooters. By the photos at the back you can see the variety of characters using the basic zombie body.


This is the standard form of the Peashooter, one of the zombies' main enemies. I decided to make two forms, the all green, and the bright blue 'Ice' shooter. Both had their cast heads mounted on a curved wire attached to a Games Workshop plastic figure base. This base was then surrounded by four curled leaves on which the plant gets around  -very Triffid like.


I couldn't work out a method for casting these leaves even though 12 were required, so I just made a simple production line of putty, cut flat into a leaf shape then laid on pieces of plasticine grooved as per a leaf. Left overnight they cured hard and could be cleaned up and mounted  around each stalk's base.
The problem with putty is that it's not as robust as resin.


A very angry hot pepper and a really dumb bulb of garlic were two of the other plants made this time round. They have yellow eyes here because they are being undercoated together and the yellow is Play Dough doing service as a paint mask. I used pearly plastic beads bought at Spotlight in a large string of many different sizes so there will be no eye problems for a long time to come.


The pepper has no visible means of support so it needed a place to call home. A little corner of the garden would do and this was knocked together quite quickly with scored and distressed plastic sheet.


The 'Ice' Peashooter has special ice crystals growing out of its head and these were made from cured putty sections, ground to points on the sander. All the colours were either Citadel or Vallejo acrylics airbrushed to give a good even coat, then gloss coated with floor polish.
One thing I made sure of,especially with these peashooters,was that the eyes were consistent in shape,size and painting method. To ensure this,I made a stamping tool to impress into the soft putty.


The three little mushrooms didn't pose a problem but just as much care was taken to get the eyes in particular, correct.
The Jalapino
I really like this guy, he's so angry and Red! You can see the use of the pearl bead for the eye here and the string hole even makes a perfect pupil. I was going to paint this hole black but then had the idea of using a short piece of plastic rod (painted black) and inserting it in the hole. Perfect! Even better was the idea to round this plastic rod in a flame to a mushroom shape and stick that in the hole, more perfect (if that's possible).


Meet the tough boys, and one idiot. They were all made using the foil core wrapped in gourd and garlic shaped putty - I love them! That shiny, pearly garlic colour is Vallejo's Metal Medium, one of my favourite paints. Garlic's little stalks are made of inserted, cured putty, but would have been stronger if made of flattened aluminium wire. That is a concern of mine, that the pieces made only of putty, if thin , are subject to breaking in the post. The main ones I'm worried about are the Peashooter's leaves.

To conclude, the three Zombies. Points of interest are the hats,- a traffic cone which is a casting in resin and the bucket, which is a truncated cone of thin card, covered in Liquid Green Stuff and painted  Citadel Leadbelcher. They all should have those stray hairs but the hats tend to flatten them as they are thin inserted copper wires. I couldn't help myself and put a friendly neighbourhood slug on the wall, which by the way is only there to cover a lump of lead that acts as a counter weight for bucket boy -he leaned over so far that he kept falling onto his fragile fingers.
If there are any more in this series then they will be the invention of my grandson, so anything's possible!