Thursday, 26 September 2013

Zombie Meerkat and Panda

I have two nephews (brothers), who have birthdays very close to each other in the same month and so we tend to give them their gifts at a date between the real days. They each have a particular favourite animal  - the older one likes Pandas while the younger likes Meerkats. These animals have been the subjects of small collections over the years and so I decided to add to their numbers with a couple of special scratchbuilt models, zombie style. 

By Googling 'Zombie Pandas' and 'Zombie Meerkats' I was astounded and gratified  to see that the whole world is zombie crazy at the moment  - just goes to show you can't keep a good idea buried for ever.  This is a page from my notebook with sketches that start the process of visualising the final model.


I decided to use the previously made casts from' Plants vs Zombies', ( made for my grandson), and see if they would translate into a panda and a meerkat with a bit of muzzle addition and some ear action. As you can see from the above, the standard round zombie head, with added putty (marked in red checks), can be made to do the job as two different animals quite well. At least it looked like there wouldn't be that much extra work, until I actually got started. Always the way isn't it?


This is the panda in its raw form with special zombie' reaching' arms. The main deviation from the original z's were the arms of the two newly resurrected animals, as their attitude to z'hood is defined by what they are going to do. I decided that the panda was going on a shuffling "where bamboo?' rampage, while the meerkat was just on z.watch, waiting for the clan to arrive before hunting some poor innocent cobras or something.


Here are the moulds for the legs, eyes and arms. I decided not to use the cast arms as they did not suit the final forms I had in mind for the models. I must have had some heads and torsos already made and that did save a bit of modelling time. One of the main things about a zombie is its eyes, usually vacant and madly staring, but also often of different sizes. A panda actually has quite small eyes ( the black fur ring around them giving the impression of large size and hence "cuteness"), so I would retain the one huge bulging eye but use a smaller bead painted red for the 'real' eye. The meerkat would get both crazy eyes from the original zombie men because it looks more like a weaselly little man anyway.


Work has begun on the new boys and they do indeed look like their sketched pictures. I had to change the mouths quite a bit as the original ones just did not suit their prospective owners. There is a lot of cream coloured resin visible here but this would change and both bodies would have to be covered with  a lot of putty before the end. So much for my short cut idea.


Pandas are chubby and a newly zombified panda needs some padding in the form of an  aluminium foil body suit. I had some thinking to do about the hands so they were left till the end. The 'pigeon-toed ' stance was planned as it adds to the ridiculous nature of the whole exercise.


The bases are really one piece of plaster split in half, super glued for sealing and ground flat for stability. Making them out of the one piece sort of unified the look of the models and of the gifts in general I felt, as they would be presented at the same time, in the same box.
More of the additional putty work can be seen and the modelling of the meerkat's jaw and teeth. Also this shot shows the cast legs put to good use, remembering that it is only one basic leg, ground at different angles to fit both sides of the body.
The line on the head is the junction of two separately cast halves as the moulds didn't lend themselves to a single mould pour.


 Quite a lot of work has been done to get to this stage

. All the extra putty is on, areas of bare flesh have been ground out through the fur, the bases have been surfaced, fangs have been inserted (as well as bamboo) and claws have been glued in place.
The meerkat's head is turned to the left but his paws are in that typical, "I'm on guard and I can stay like this all day"pose.
The main thing this shot shows is the texturing that I have added to the fur.
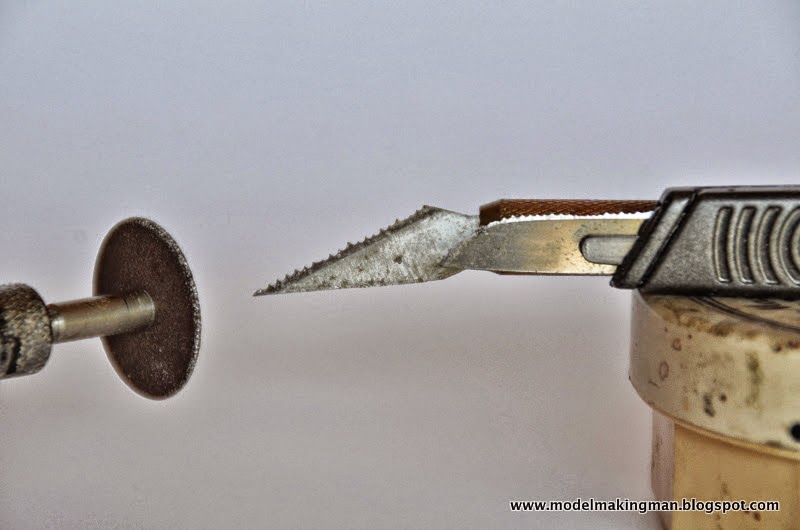

These are the tools I used to scrape the fine lines into the putty to simulate fur. I used a thin cutting wheel in a motor tool to cut tiny teeth into two different knife blades. The rounded blade allowed me to follow contours on the models more easily.


Undercoated in all their glory but without their eyeballs which have been painted and glossed separately.


The finished models, painted ready for boxing and presentation to the boys on that 'between the actual birthday, day'. I used Citadel acrylics as well as their Shades (washes)  and made sure the bare skin was painted a suitably dead colour to contrast with natural fur colours - easy in the case of the Panda but  tough in the Meerkat. For a seemingly drab desert animal, it has a surprisingly complex coat.
I think the crazy red eye works well on the Panda don't you?


I couldn't pass the chance to put all the zombies together and here they are. Pity most of them are with a certain grandchild because they missed one hell of a party!


Thursday, 25 July 2013

Plants & Zombies


My grandson is turning 4 next month and has discovered the game Plants vs Zombies. I had mentioned to my daughter, a huge zombie fan, that I happened to have a spare set of legs (originally to be used for the Typhus model), and that maybe he would like a friendly zombie figure for his birthday. It was then I was introduced to the phenomenon that is "Plants vs Zombies. I googled the site, took photos of the images and printed out some to help with the modelling and these are the ones made so far. The zombie figures stand about 140mm tall, I'm not too sure how the others measure up in correct size relation to them, but I doubt that a 4 yr old really worries about such things. He has assured me that he knows that they are models and not toys and that he would really like to start a collection of his own. Normally this would be crazy talk for such a young kid but I know the type of household he lives in and I believe he certainly would know how to treat them.


Above are some of the pages in my sketch book which allow me to come to grips with my subjects. I was using this modelling project to practice mould making and casting in resin to a greater extent than I have before. I could see the zombies in particular have a great range of forms and I did not want to have to make totally new ones every Christmas and birthday, or for as long as the interest reigns.
This meant the modelling of certain parts of the body - a generic head, two sizes of eye, torso, a right and left arm and one dual purpose leg. I figured that casting two legs and grinding the hip area to be either right or left was easier than making two masters.


Here are the masters modelled in Apoxie Sculpt. Note the angled shoulder and hip areas and the basic form of the hands. I tried to simplify the shapes of all these masters so that any changes made later could be as painless as possible. Addition of fingers (so important in the' grasping at nothing' of a zombie) would have made the moulding very complex, as would the gums and teeth.
Once the figure was posed, the clothes had to added in their many combinations based on what character was needed, so a great deal of detailed modelling was not going to be avoided in any case.


These pictures show the masters, moulds and castings of the main parts of the zombie body against a scale for reference. My dad would have been proud of me - engineer's son and zombie maker!
Some of the moulds gave problems. The leg mould did not allow the resin to get around the ankle turn  and a cavity formed which had to be filled with putty. I did not think the large head could be done as a single item (the face had too many undercuts), so I poured it in two halves, to be joined after fully curing.
As usual with silicon moulds you can see the registration knobs/ holes and the two cuts in the rubber, one for resin, the other for air to escape.


Here are the halves of the head as well as fingers on the hands made in two different ways. They really gave me a problem as Apoxie is not that good at sticking to a skinny finger shape. I came up with about four different ways to make a zombie's finger and probably used them all.


This is what faced my wife on the dining room table the morning after - cute eh?


The joys of casting. Suddenly there's more than one! These little guys have legs joined (twisted foot and all, for one of them), gums and teeth inserted but no permanent arm poses as yet. I thought that the main clothes, shirt and jacket, would be easier to add without an arm being in the way.
The eyes, seen here with inserted wire handles, were being prepped for airbrushing after a session in a power drill spinning against sand paper to thoroughly round and smooth them. The wires were also  useful in rotating the eyes while being sprayed a nice gloss off-zombie-white.

A selection of hands with attached fingers. The first one, on the right, was pure putty and took forever - method rejected. The others are variations of plastic tubes bent in a flame and inserted onto a wire drilled into the hand. I even cut the tubes into small sections so that the curves in the fingers could be followed - third from the right. Anyway they were all used, I mean a zombie's fingers are the body parts most likely to fall off on a daily basis aren't they?


Zombies with pants and shoes as well as the first plant master, the Peashooter. As with most of the plants, this was made around an formed aluminium foil core and covered with Apoxie. I made a tool out of the same putty to impress the eyes in this plant and all the mushrooms. This repetition of eye shape really helps in unifying the group of plant models as well helping the later painting process.


What a fine body of body parts. You can see the zombie head joins as well as the bent arm, (made easy by cutting the arm at the elbow and filling the subsequent joint). Different poses are easy to achieve with a slight adjustment of where an arm or leg is attached. The large heavy heads meant that the models couldn't stand on their own two feet and they needed to be attached to a larger base - these were all made at the same time by pouring a plaster slab and dividing it between them.
In this photo can be seen two individual 'angry gourds', three cast mushrooms and three peashooters. By the photos at the back you can see the variety of characters using the basic zombie body.


This is the standard form of the Peashooter, one of the zombies' main enemies. I decided to make two forms, the all green, and the bright blue 'Ice' shooter. Both had their cast heads mounted on a curved wire attached to a Games Workshop plastic figure base. This base was then surrounded by four curled leaves on which the plant gets around  -very Triffid like.


I couldn't work out a method for casting these leaves even though 12 were required, so I just made a simple production line of putty, cut flat into a leaf shape then laid on pieces of plasticine grooved as per a leaf. Left overnight they cured hard and could be cleaned up and mounted  around each stalk's base.
The problem with putty is that it's not as robust as resin.


A very angry hot pepper and a really dumb bulb of garlic were two of the other plants made this time round. They have yellow eyes here because they are being undercoated together and the yellow is Play Dough doing service as a paint mask. I used pearly plastic beads bought at Spotlight in a large string of many different sizes so there will be no eye problems for a long time to come.


The pepper has no visible means of support so it needed a place to call home. A little corner of the garden would do and this was knocked together quite quickly with scored and distressed plastic sheet.


The 'Ice' Peashooter has special ice crystals growing out of its head and these were made from cured putty sections, ground to points on the sander. All the colours were either Citadel or Vallejo acrylics airbrushed to give a good even coat, then gloss coated with floor polish.
One thing I made sure of,especially with these peashooters,was that the eyes were consistent in shape,size and painting method. To ensure this,I made a stamping tool to impress into the soft putty.


The three little mushrooms didn't pose a problem but just as much care was taken to get the eyes in particular, correct.
The Jalapino
I really like this guy, he's so angry and Red! You can see the use of the pearl bead for the eye here and the string hole even makes a perfect pupil. I was going to paint this hole black but then had the idea of using a short piece of plastic rod (painted black) and inserting it in the hole. Perfect! Even better was the idea to round this plastic rod in a flame to a mushroom shape and stick that in the hole, more perfect (if that's possible).


Meet the tough boys, and one idiot. They were all made using the foil core wrapped in gourd and garlic shaped putty - I love them! That shiny, pearly garlic colour is Vallejo's Metal Medium, one of my favourite paints. Garlic's little stalks are made of inserted, cured putty, but would have been stronger if made of flattened aluminium wire. That is a concern of mine, that the pieces made only of putty, if thin , are subject to breaking in the post. The main ones I'm worried about are the Peashooter's leaves.

To conclude, the three Zombies. Points of interest are the hats,- a traffic cone which is a casting in resin and the bucket, which is a truncated cone of thin card, covered in Liquid Green Stuff and painted  Citadel Leadbelcher. They all should have those stray hairs but the hats tend to flatten them as they are thin inserted copper wires. I couldn't help myself and put a friendly neighbourhood slug on the wall, which by the way is only there to cover a lump of lead that acts as a counter weight for bucket boy -he leaned over so far that he kept falling onto his fragile fingers.
If there are any more in this series then they will be the invention of my grandson, so anything's possible!


Sunday, 9 June 2013

Modelling Typhus Part 6 Conclusion - Painting and Basing


Painting -  I'm afraid this is the part of a project that I enjoy the least. Maybe, because of the amount of work that has gone into the build, I feel that it should be finished then, and yet there it is staring at me, unpainted and accusing. The trouble is, a familiarity with Games Workshop Golden Daemon paint jobs has put the stakes so high. I know what this model deserves in a finished form and yet also know that I probably will not be up to that standard.
Korpus took so long to paint in the GW style using their acrylics, that I decided to opt for oils, hoping that the large areas in a model of this size would lend themselves to the blending qualities of the oil paint.
This pic shows the body sprayed in an acrylic basecoat of various greens and the head, brush painted in the recommended Tanned Flesh. My source for the painting came from White Dwarf (GW's monthly magazine), number 382 Pg. 56, an article by Seb Perbet where he did a full Masterclass on Typhus, Herald of Nurgle.

 
 Here is the first use of the oils and you can see how the various colours (olive green, burnt umber and sienna, phthalo blue etc) cover the underlying acrylics so well and blend over the large surface of the greeve. Two characteristics of oils are also visible - their slow drying and their shininess, even when dry. I wasn't too worried about either of these as this model didn't really have a deadline, but I really did mourn the lack of other qualities of acrylics - easy cleanup, no smell and a thinner application layer.


The head is finished and finally glued in place. Remember that I mentioned something about not being happy with the length of his right forearm? Well I did a job on the offending limb and, with a fine bladed fret saw, cut about 1cm out of the middle of his arm. I then had the problem of bending the right hand and scythe handle backwards to allow the joint to be Araldited together. It was successfully joined but perhaps there could have been a bit more removed. Maybe much later in the future when it bugs me too much - but for the moment, it stands.


Various oil paints have been applied and the whole thing is slowly coming together. Those damn hive funnels were a pain to paint as different oil colours cover their underlying colours to vastly differing degrees. You can see here the shiny oils as opposed to the matt acrylics and just a positive hint of some successful highlighting.

 Basing - Unlike painting, I really enjoy putting the model on a suitable base and try to make it add to  the story of the character on it. This is the first time that the black baseplate had been permanently glued to a specifically shaped base board. The model had to be raised so that the scythe could swing free in space and a layer of polystyrene was added to a thinner layer of plywood.

 
 My main idea for the base was that of a rock shelf set above a churned up, muddy battlefield, with a horde of severed skulls spilling out from under the rock. To accommodate this skull pile, room had to be made by carving the foam, ply and pine, as seen above. This was without out a doubt, the hardest, noisiest and most irritating part of the whole build. I had limited angles of attack due to the figure above and ended up using an angle grinder (probably the loudest hand power tool this side of a router). Not only was it slow and noisy but it caused all my smoke alarms to go off at once. I found ones I didn't even know I had, screaming at me from inside tool cabinets even!


Once finished, the hollowed out area seemed suitable and the rock shelf could be added. This started as a shaped piece of polystyrene pinned and glued to the black figure base.


I have started to cover the 'rock shelf' with Apoxie Sculpt which was then worked into horizontal, strata- like layers with a few random rock bulges added for geologic correctness.
Extra holes had to be drilled to help take some more skulls - I did not want to have to pick up that grinder again.


Here is a view of the back of the rock shelf showing some nice details added with the silicon tipped brush. Geologically speaking, it is a bit vesicular.

 Love those skulls! Celluclay, a ready mixed papier mache product, makes a perfect groundwork, especially a muddy one. It was mixed with some earthy coloured acrylics and went on as this strange purple mud, liberally prodded with a large paint brush to form holes that would gather water and general liquid gunge.
Some tall grass was added, poked into areas that needed a bit of a lift. I think I added it because I had the stuff, but I quite like the effect even though the clumps are a bit 'wooden'. Must research on how to use tall grass clumps effectively.


This method of finishing the base surrounds in lead sheet, is an idea I used on the Korpus figure and seeing as how the two models are sort of a pair, I decided to repeat it. Being able to carve his name into the lead is a bonus of course.
Various GW washes were used all over the model, especially the rocks which had been painted in acrylics. I used Codex Grey, drybrushed with lighter greys, browns and a few greens. The mud was painted with browns, greys and black and then a mixture of inks - brown, chestnut, green and purple - was applied with a flow of Realistic Water,( a clear acrylic liquid used to make pools and puddles).


The only thing left to do was add a felt cushion on the bottom and this was easily done with PVA.


At last, it is done. These four views give a good all round idea of the Typhus model that I started on the 18th March 2013 and completed in early June. Much of that time was taken with the painting but if I ever become more proficient at that side of this modelling lark, then more monsters will be on the way. 


Here are the two models together for their first family photo, along with with the GW miniature. I am quite pleased with how Typhus turned out but I will be making a list of a number of things NOT to do next time. The problem is, will I ever learn from my mistakes or will I just keeping inventing more of them? Time will tell.