This chest area has had a number of different treatments, mainly due to its curvature and size, but the addition of the front cables was the most radical. The size of the central unit was such that if it were placed on the surface, it would protrude too much, so I decided to excavate an area for it to be dropped into the chest. Various Dremel tool tips allowed the job to be done fairly neatly and even though it looks quite painful, no monsters were harmed in the fabrication of this area.
General overview pictures of the cabling in place as well as details of the typical Nurgle bloated and rotting belly, complete with pustules so large they look like eggs.
Other features include chain mail made from lengths of jeweller's chain hung in super glued parallel rows, collar spikes added to the gorget around the head casket and strange hip pieces that all 'space marine' type figures have.
I have added rivets (made from slices of plastic rod), to any piece of piping to show the mechanical aspect of these super warriors, as well as smaller cables connecting upper leg to the knee joint.
Two succeeding pics of the left side, showing the treatment of the space between the body and arm which gave me a bit of a headache earlier in the build. Putty was added in a layer to cover the smooth plastic surface and then more was added in various places to build my preferred, 'hive' structures. I alluded to using these when there was a space to fill, but only with an appropriate structure. I think that the 'hives' fit the bill.
Here is a good overview picture of the figure showing the left hand gripping the weapon and subsequently, the whole idea of the Typhus model. In this can be seen the 'hive' structures doing their job of appropriately filling the gaps under the arms.
Three views of the left hand in the process of gaining its armour. Thin lead sheet was cut individually to fit each finger and to link the top plate to the lower. A cutting wheel on the motor tool was used to abrade the edges of each piece to denote battle damage and general wear.
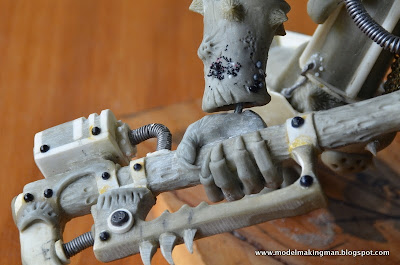
Here are similar shots of the right hand showing the rivet detail on the hand armour as well as some closer details of the weapon. It had the same 'hive' treatment as the main body but with a little subtler use. In these pictures can be seen the 'wood' treatment of the haft of the Manreaper and those parallel marks, indicating timber, were made in the putty covering with that silicon tipped tool I had mentioned earlier. The black hemispheres, representing large rivets, are found in the scrapbooking or jewellery departments of craft shops or cheap outlet stores. They come in a range of sizes on a plastic sheet and have a low tack adhesive on the back. I chose black ones but pretty pink would have done just as well.
In the next entry I will cover the modelling of a different and spectacular daemonic left pauldron, as well as possible plans for the display base and maybe some ideas on painting the monstrosity in oils.


No comments:
Post a Comment