
The polystyrene was covered with a layer of casting plaster mixed up with random pebbles, bromeliad roots and anything else I could find that I reckoned would make for interesting textures. It was a trifle hit and miss but really the painting gets a bit wispy at the base so no harm done. I did add some Apoxie tentacles and imbedded them strongly into the plaster on the figure's right.

Every great Nurgle lord needs an entourage of Nurglings - lesser nurgly daemons that are really just cannon fodder unless in overwhelming numbers - and this little guy gets to have pride of place at his master's feet. Many Nurgle creatures only have one eye, I don't know why it swallowed the fly. (Oh my god, too much influence from a 3yr old grandson)

At the other end of the base is a construct of the dribbly remains from a resin pour and an Apoxie tube worm. Following the philosophy of never throwing anything out, I always look at any bit of stuff that comes my way and ask if it could have a place in the great scheme of things, and the answer is usually, yes, of course it could. When you pour resin into a mold, there is always an amount left and this can be encouraged into some amazing shapes, especially by inverting the cup and pulling strands, letting gravity do something useful for a change.


You can see them better in this pic as well as other details of the chest area. The aforementioned star of Chaos is there (quite fiddly, to make with added spokes and arrowheads), as well as cords with their clamps, a strange spiked device and some cool attachment pieces. When something as simple as a thing to tie a chain or rope to, is made properly i.e. IT WORKS! then this modelling gig really becomes fun.
You can become so sick of the sight of what you are making that continuing is painful, hence so many "works in progress" owned by modellers. Lucky for me I am easily impressed by the simplest of successes.

Here are some of the heads attached with thin copper wire and although they looked okay I eventually changed the wire to thread, as they "hung" better. The wire just didn't give the impression of weight which is so important in the modelling world, where we are dealing with quite light materials but want to represent things that may be amazingly massive - I'd say old Korpus wouldn't be any sort of lightweight.

My biggest problem in the whole build was the cloak and this shows the first attempt using fake fur. As
it came, it was too soft looking and gentle. Something had to change its textural appearance so I singed it with a lighter, just frizzing the synthetic fur until it took on the above look. All well and good I thought, but as with the "hanging" problems of the heads, it just didn't flow as the wind blown cloak of the painting did. A major change had to take place but it happened quite a while later. Some things are so daunting that it's best to have a bit of a holiday from them - hence the foray into the flies.

The painting shows some Nurgle flies hovering around the base (anywhere a Nurgle lord walks becomes a disease ridden dung heap and of course there you find flies). This is the earliest photo of their build, but a thick aluminium wire was wrapped with three thinner wires and the body modelled with Apoxie.

The wings were made by bending guitar string wire into the correct shape, then laying them between two sheets of tissue paper soaked in PVA glue and leaving them overnight to dry. The straighter of the two wires was left longer and it is inserted into the cured body and super glued in place.

One set of legs was left longer than the others as it was similarly used as the glueing attachment.The eyes were made the same way I make large rivets, that is by bringing a plastic rod close to a candle flame, waiting for the plastic to heat and"dome", then squeezing the soft plastic to a lenticular shape. When cold and hard, the eye is cut off the rod and the procedure repeated until you have more than needed, so the best matched pairs could be chosen. The proboscis was carved out of that hard grey plastic that is so handy, drilled, pinned and glued in place. I went to the trouble of individually placing tiny wire hairs into some fresh Apoxie on the thorax.

Voila! A finished, painted and thoroughly evil septic green Nurgle fly, too bad I decided both the colour and size were wrong - fool! I ended up making another three of the things, but I still have the originals which could make a vignette with them harassing some poor creatures.

Here are my notes outlining the building stages, as it had been awhile since the originals were made.

The final colour scheme changed to a sickly grey maggoty colour because the WHOLE model was repainted for the Golden Daemon 2012 - this happened over about 9months and I will probably not be doing something as crazy for a long time. ( Sez he.)


. I used thick lead so that I could incise the monster's name into it with a V-groove lino cutting tool.


The time had come to confront the problem of the cloak and the only way I could see of doing it was to basically mould one. I had to have a form over which I could lay some stuff, be it fabric, paper or putty -at this stage I was willing to try a number of materials. The form had to be big enough to cover the area across his back, down to near ground level and all the way out to the right side as you look at it.
It was made of casting plaster, cheap, easy to carve when "green" and robust enough to stand up to some vigorous use. The above is the final carved form and all I had to do was wait until it was dry, in the meantime trying to find a suitable material to coat it with.

I settled, not surprisingly, on a thin layer of Apoxie Sculpt which was rolled out on a powder covered board with a gal. pipe roller - nice and heavy. As this putty gives you about an hour's working time, I was able to coax it into position, tear holes where I wanted them and think about how I was going to attach it and where. After curing over night, I found it to be quite fragile and in need of reinforcement. Super glue was spread all over it, both sides (what fun that was), and then I remembered some thin Japanese paper a friend of mine had given me. She is always looking for stuff I could use and like I've said before, friends are the best!
This paper had a structure where you could see the various threads and fibres used to make it. Laid over the form and softened into the grooves with diluted PVA, the paper took on the appearance of skin with the blood vessels close to the surface - perfect for Nurgle
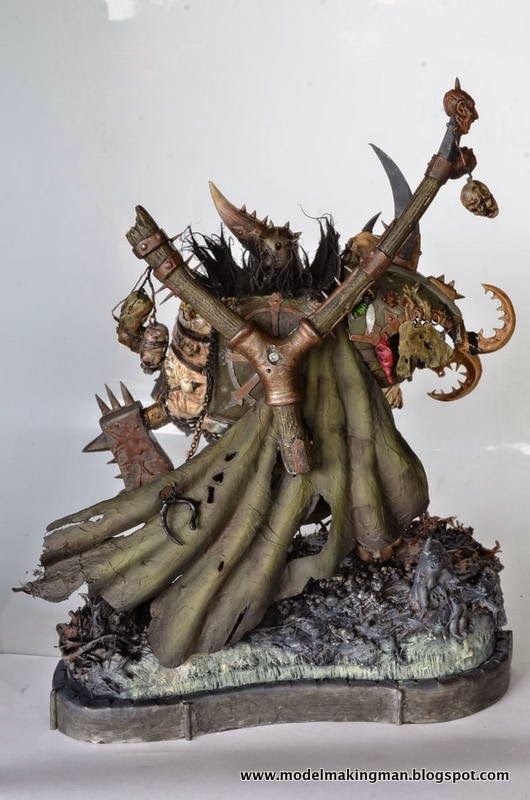
Here is the cloak in position, air brushed to show the folds and doing all the wafting necessary as shown in the painting. Here you can also see the attachment of the trophy rack, the ill hanging heads and the start of the Adrian Smith standing up hair.

See what I mean about those heads? All their connections had to change, but I'm happy with the cloak.
No comments:
Post a Comment