

These are two photos I found on Pinterest and they gave me a real use for many of my older aircraft model kits where the plastic is brittle and the decals are shot. Subsequentally I have found a lot more, some where the fuselage is reversed just to be different. The idea of making an even vaguely sensible vehicle is new to me and as ork buggies do not qualify, I faced the dilemma of proper wheels and suspension, things I have taken for granted in the past.

This is an old Matchbox Bf109 in 1:32 scale so it is a good size and should lend itself to a nice level of detail. I did not count on the fragility of old plastic because when parts did not quite fit they decided to break, hence the large amounts of filler employed in the construction. The wings were cut off to stubs and the tail plane removed to be rounded off with car body filler or bog. One unfortunate thing happened in trying to get an overall impression of the car with its canopy in place, I bumped my arm and the 3 part canopy decided to separate with the only essential part, the front screen disappearing down the back of the largest, heaviest cabinet in my workshop. Oh great!
Forget this for a while, I can always empty the thing and muscle it away from the wall to retrieve the bit later, now however there is the problem of wheels. Even though the main part of this build is a kit bash, I do not have suitable wheels for a car of this size (lots of 1:35 tank wheels, much too small) and as I am a scratchbuilder by preference, my wheels would be made by me.


These show the process I used. I made a master wheel half, cast it then joined the halves to complete the wheel. The top pic is a circular screeding jig made to form a sausage of Apoxie Sculpt into half of a tyre and happily, it worked! Wonders never cease. A ring of copper wire was added to form a wheel rim and a central hub as well then the whole was cast in silicon rubber. In the lower pic the grey master, pink mould and white TC890 resin cast can be seen. From the shadow in the final cast you can see that there is a reasonable wheel well and this is adequate to hold the brake drum etc.
Two of these cast halves were joined to make a slick tyred wheel 52x13mm and all I had to do then was make 3 more.
Now came the bigger problem of suspension, that mass of struts, springs, rods and stuff that joins the wheel to the body.This would be so visible in the model that it had to be done well enough for my engineer friends to look at it and nod in the affirmative. I did a lot of research and became thoroughly confused with the plethora of systems that have been employed over the years but, in breaking up a superfluous to requirements Tamiya Sd.kfz 222,( a small armoured car), I found a suspension that could do the job. The next three pics are of this arrangement and its main constituents are two large vertical springs partially enclosed in cylindrical supports.
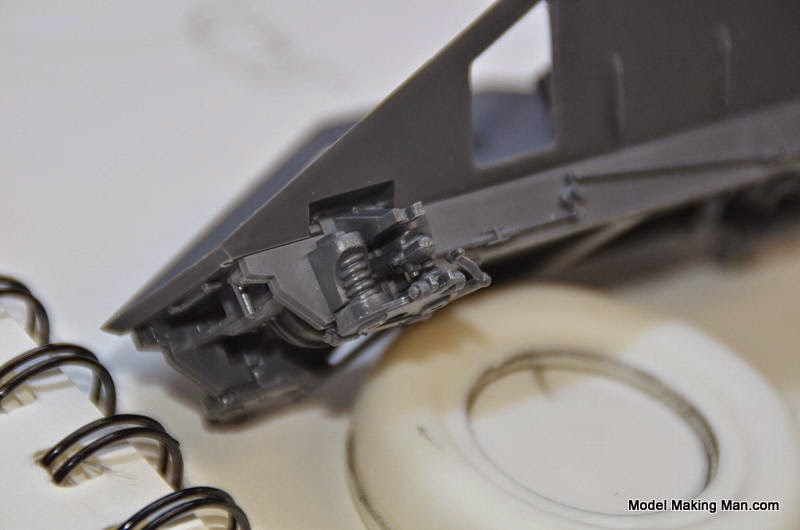


Here is a sketch of the suspension to help me decide on what I had to build and the dimensions that would suit the size wheel I had.The resultant size was about four times the small model and so basically every dimension was doubled, giving a X4 ratio for the two measurements of length and breadth.

This shows lengths of copper wire resting on my sanding board (with strips of different grits of sand paper). I needed a strong flat surface to straighten the slightly bent wire and the board, when rolled over the wire on a hard substrate, converts it from the two bottom wires to the pretty straight top one.

Before I leave the sanding board which makes flat sanding so easy, I would point out that it is mounted in an old picture frame and that makes cleanup of sanding dust a lot easier. I can rub a cast resin piece on the three grits in order and get a nearly finished surface and then vacuum the whole board to remove the dust.


Making the springs was easy with nice straight wire, a vice and a compatibly sized form to wrap around, in this case a steel punch.

While talking about the model with my artistic son-in-law,we got onto the fact that the wheels would look better with a tread pattern rather than the cop out slick look. So, this is my workbench at midnight after we explored every thing that could give a tread-like texture to my wheels. We finally decided on the knurled sleeve of an old brace and bit and even though I was tempted by some really cool mesh patterns, I did go ahead with it.
The photos below show the sequence of transferring the knurling pattern onto a strip of Apoxie Sculpt and the adhering of this strip to the wheel.

A rolling board with 1mm high sides was made long enough for the circumference of the wheel and marks for an appropriate width(one wide enough to cover the top as well as part of the sides ). A sausage of the putty was laid down the centre and a smooth roller (a piece of 1inch gal pipe) was run over the top, the 1mm side pieces assuring a 1mm thickness of putty.

Here is a sideways look at the knurled cylinder from the brace and bit doing its job of pattern transfer onto a well flattened strip of putty. Note the white talcum powder everywhere, this is to prevent putty sticking to the base board and to the rollers.

The purple lines define the width I deemed necessary to go over the wheel and drape down the sides and a thin steel rule cut the textured putty to this size. Now to get it off and onto a wheel.

Let's just say it didn't give up without a fight, all 1mm of it. I had to shimmy a knife blade under it for the whole length before very gingerly transferring it to a larger but smoothly rounded surface to cure a bit more before application to the wheel.


This is the jig I made to do the tread transfer and I'm pleased to say it worked! PVA was applied to the wheel and the strip draped and rolled on, just like that. The right side with the screws is removeable to allow the wheel to be mounted spinning on an axle that also carries two 1mm discs. These discs are what will terminate the overlapping putty and give a defining line along the side of the wheel.


No comments:
Post a Comment