Sunday, 17 August 2014

Library Book Fair display 2014


Apart from making monsters, I am often asked for help with arty projects such as our annual Harvest Festival and in this case, a Book Fair at our local school - where I was a teacher many years ago. I would be helping a dear friend of mine and this was her first big display.
The entrance is to the right of the two mats and the glass doors were blanked off with newspaper so that the full effect would only be seen at the time of first opening.
I had made a rough plan of the whole thing based on a numbers of layers, from the grass at the bottom back to the fence then the plants and finally the background.


These four shots show the full 7m length of the display and all the component parts, including giant sunflowers, fence, grass, bugs, painted layered background and clouds.


This is the not so appealing back of the display and like a theatre flat, the reverse is rarely as good as the front, but it does show some strong timber uprights that the school groundsman managed to find.
These supported the tall flats which were wilting due to the humidity and threatening to derail the whole garden. We may have wanted the tall sunflowers to lean over the children but not the sky and clouds as well!
Thank you Steve.


This shot shows the layered effect I was looking for. I had made many glued blocks of cardboard and we stuck them behind anything to make them stand out in relief. The shadow formed behind the piece gives it a certain false 3D character which adds to the overall effect of a busy, interesting garden.
I don't know how many smiley faced flowers of various sizes we made but there were a goodly number and everything had to be cut out from heavy box cardboard. Lots of sore fingers but it was worth it. Maybe not next year perhaps?


Here are a few of the little creatures that I painted for the display, each one cut from thick display cardboard.  They were the last things to be added and were there to fill up the spaces and make things look busy and cute.


Here is the proud lady herself and the whole library decked out for the show - it was a great success and the school has requested that it remain in place for the 100th anniversary celebrations later in the year. 


Of course you can't have a book fair without a visit from a Bookworm and this one is cleverly edible!
Chomp, chomp!


x


Friday, 25 July 2014

Cherry Bombs and" Peace" Part 1


This entry celebrates the return of our computer finally, (thanks EJ ), after a long stay in the wilderness of "what the hell is wrong with it?" and the upcoming birthday of my zombie loving grandson. I have it on the best authority that he would like a model of the Pvs Z  Cherry Bomb.
Here are some initial sketches and thoughts in notebook No.16.


Apart from the lack of recent blog entries, the photography sequences are not that crash hot. It seems I have made the spherical master (from Apoxie Sculpt) and have worked out the best way of casting it in silicon rubber. Really it was so long ago, that I'm just going by the photos I have, to figure out what I actually did. I must have decided that the detail of the face needed to be directly below the inlet for the resin to nullify the problem of undercuts.


Normally I cut the resin inlet and air outlet into the dividing line between the two halves, but here have gone for two punched holes in the centre of the back of the head. This will allow the resin to pour evenly around the bulges of the eyes and mouth.


It obviously worked, as this pic shows the master between two cast cherries. A lot of work has been done to the casts as displayed here. Those tricky eyelids, that give so much character to these mean little cherries, were I remember, a pain. Too much here, too little angle there, how thick,where to finish, how much eyeball to cover, all these and more made up what is, seemingly, a very simple sculpt.
The mouths with their asymmetrical teeth were an adventure with the motor tool of similar proportions to the eyelids.
I forgot to mention that the eyeballs were plastic beads where the holes become the pupils. This is a technique I use often and it hasn't let me down yet.


The cherry stalk proved to be a problem in that it had to be correctly shaped (simple wire is too uniform) so such wire was joined, covered in putty and cast to make a natural looking twig. The junction points with the spheres was a bit of hit, miss and hope, with the help of a bit of filler.


Everything is shown here, master, moulds, casts and undercoated cherry bombs.


You can see in this closeup that those teeth took a bit of filing, fitting and finishing. I felt at one stage that I'd have to create some special "plastic teeth, for the gripping and fitting of,tool", before I managed to get them into their proper place.


Of course there are no photos of the stages of the paint job, but let it be said that they put up a fight before the angry little buggers were done. All in the name of being a loving Poppy.


"PEACE"  Part1
   I think this is the name given to the red rider character created by William Stout. I have been a Stout fan, especially of his prehistoric art work, ever since I bought his book,' The Dinosaurs', published in 1981.
With the advent of the internet and the ability to find something about anything or anybody, I have seen so much more of his hugely varied output.
The red rider astride a weird blue bird beast, crops up whenever Stout is mentioned. It has been reproduced in many different styles, from line drawings to full oil paintings and I would like to do it some justice as a sculpture.


Here are the first stages of my process. I have a decent picture of the subject and from there I enlarge it to working size by squaring it up. As you can see it will be about 300mm high as I intend to model the base as well, blood dribbles and all!
The face of the rider is seen at an angle, great for a painting but we need more than that for a 3D piece. This means that any clues from the painting have to be interpreted into "the round". I have to know what he looks like from the front, back, side and even top. A figure if well rendered, and Stout's are certainly that, gives hints that help answer the questions about what is hidden in the flat world of a 2D picture. The angle of the neck, the twist of the shoulders, the slump in the saddle, all reveal how and what should be seen in the final figure.
The sketches in my notebook are my interpretations of various views taken from the original.


If the rider is important then his mount is hardly less so and the process of converting what is seen in the picture to a possible 3D model is undertaken the same way. The beast gave me more trouble than the rider because the clues in the picture added up to a creature that could not be proud of its profile. Three quarter shots only for you my son, stay away from side views unless you want all your enemies to die from laughter. I can see now that those ears are going to prove troublesome.


On to business. A simple armature of wire and plastic mounted on a wooden base starts the process.
Care is taken to get the width of the beast's hips correct as this will determine the rider's" seat "on its back, how wide are his legs spread and from that, where his feet will end up in the stirrups.
Most large two legged birds actually quite a narrow distance between their feet. Cassowaries, for instance, have a very narrow double foot stance for such a huge bird. This is an important aspect of the whole figure and will be most evident from a front viewpoint.


As I only had a curl of wire at the head, I needed to have an extra support for the beast's great long face and so added this structure to carry that huge hooter.


Standard procedures here with foil being used to bulk out the body. A start with Apoxie Sculpt has been made on the head.


Well on the way now with eyes added (black plastic beads) and the contours of the head coming along.


Here is that troublesome profile shot and the first hint of a problem. In the painting the creature has fangs visible protruding below the end of the nose, but where do they come from? From first glance this animal seemed to me to be rather giraffe like, in that its drooping top lip hung quite low down, past its lower jaw. That would put the upper tooth/fang line to be well back of the nose tip. What then is the shape of its mouth and how far and how much would it be visible from the side?
Problems to be solved but isn't this why I do the things I do? Sure is, so bring it on Mr. Stout.


Apart from beast fang things, I had the whole rider to sculpt and to help in this job I decided to bite the bullet and do something I had been meaning to do for ages, make an armature for a human figure. This meant deciding on a style that would do many jobs but would be easy to cast each time I needed an armature. The sketch above was the way I decided to go, making a head, torso, hips and two sections of legs and arms as well as generic feet.


And here he is! The masters are simple shapes modelled in Apoxie Sculpt and cast in one piece moulds. The cylindrical pieces are easy to release from the mould and the larger three have the mould sliced half way down to make the release just as simple. The feet are done in a mould made from a silicon putty and are even quicker to de-mould. All the pieces are quite slim and clothing added will bring the figure up to size.


The above are a couple of views of the model so far and I'm pleased with the ease with which the cast armature pieces allowed me to find the stance of the rider. This is something I haven't done before but I am encouraged by progress so far. A lot of the foil is covered in cold porcelain just to see how it works. After a while it has cracked but any thing behaves badly in our climate, you just have to find a way around the problems.


Just to show how versatile the armature is, I made up a potential figure for, you guessed it, a zombie - but this time a real nasty!
See you soon for "PEACE" Part2


Sunday, 4 May 2014

Possessed Puppets


We had been invited to a fund raising trivia night at a local school and as it is always themed, we had to come up with something appropriate. The theme was," Once Upon A Time", but in a cracked interpretation of classic fairy tales. Each table of six was given an individual title and ours was -Possessed Puppets- which was a much easier idea than' The Princess and the Pea.'
 This was mentioned to me on the Wednesday before the event on the following Saturday, so I immediately started to create a large puppet for each member of our team.


Sorry about the lack of rotation but this gives a good idea of what I had envisaged, a long, lanky body with a Tim Burton inspired head.


This is the working plan and you can see that it's about 55cm long. Against this I was able to measure  all the various body parts and there were plenty! Six puppets means six different heads, six similar torsos, twelve hands and feet, twelve arms and legs (which would be made of two sections), and assorted clothes etc.


As I said before, the faces were to be Tim burton inspired as I feel he captures the essence of "Possessed" to a tee. Here are the sketches that Google yielded up and I felt quite happy about their suitability.

This is a checklist I started for the six puppets but really all it did was tell me who was going to get what.

Because most of the work went into the limbs, I include this to show how they were made. Newspaper was rolled up, taped at the ends then wrapped in cut and measured pieces of an old sheet I found in my "rags for the use of" bag. Each cylinder was then hand stitched in three places, very quickly and with little heed to neatness (not necessary considering the subject), and a blob of super glue with a bit of kicker added to each stitch. This made the tiresome task of making 36 limb pieces quite easy.


The heads of course make the model and I would have liked to have had six styrofoam balls ( 10cm dia.),  instead of just the two I found. The grinning idiot at the top is one such ball but the cute girl and her toothy mate at the bottom were made by wrapping layers of newsprint around a set of smaller styrofoam balls(5cm). Half way through the vigorous wrapping procedure, the balls were given a good bashing with a small hammer to persuade them to stay spherical and masking tape wrapped around to maintain that shape. Due to the different material, these paper heads became quite heavy compared to the foam ones. This caused a definite 'sagging from the neck' problem which necessitated the insertion of skewer sticks into the heads and thence into the tops of the torsos - not as easy as it sounds.
Once the ball was made it was shoved into a sock (we have a wonderful second hand clothes shop in our little town) and then coated with thinned PVA glue before  hanging in the sun.
Now that could have been a real problem as the town isn't known for its sunny days, but we do live in the tropics so when the sun does shine, it is very hot! They all dried off well.


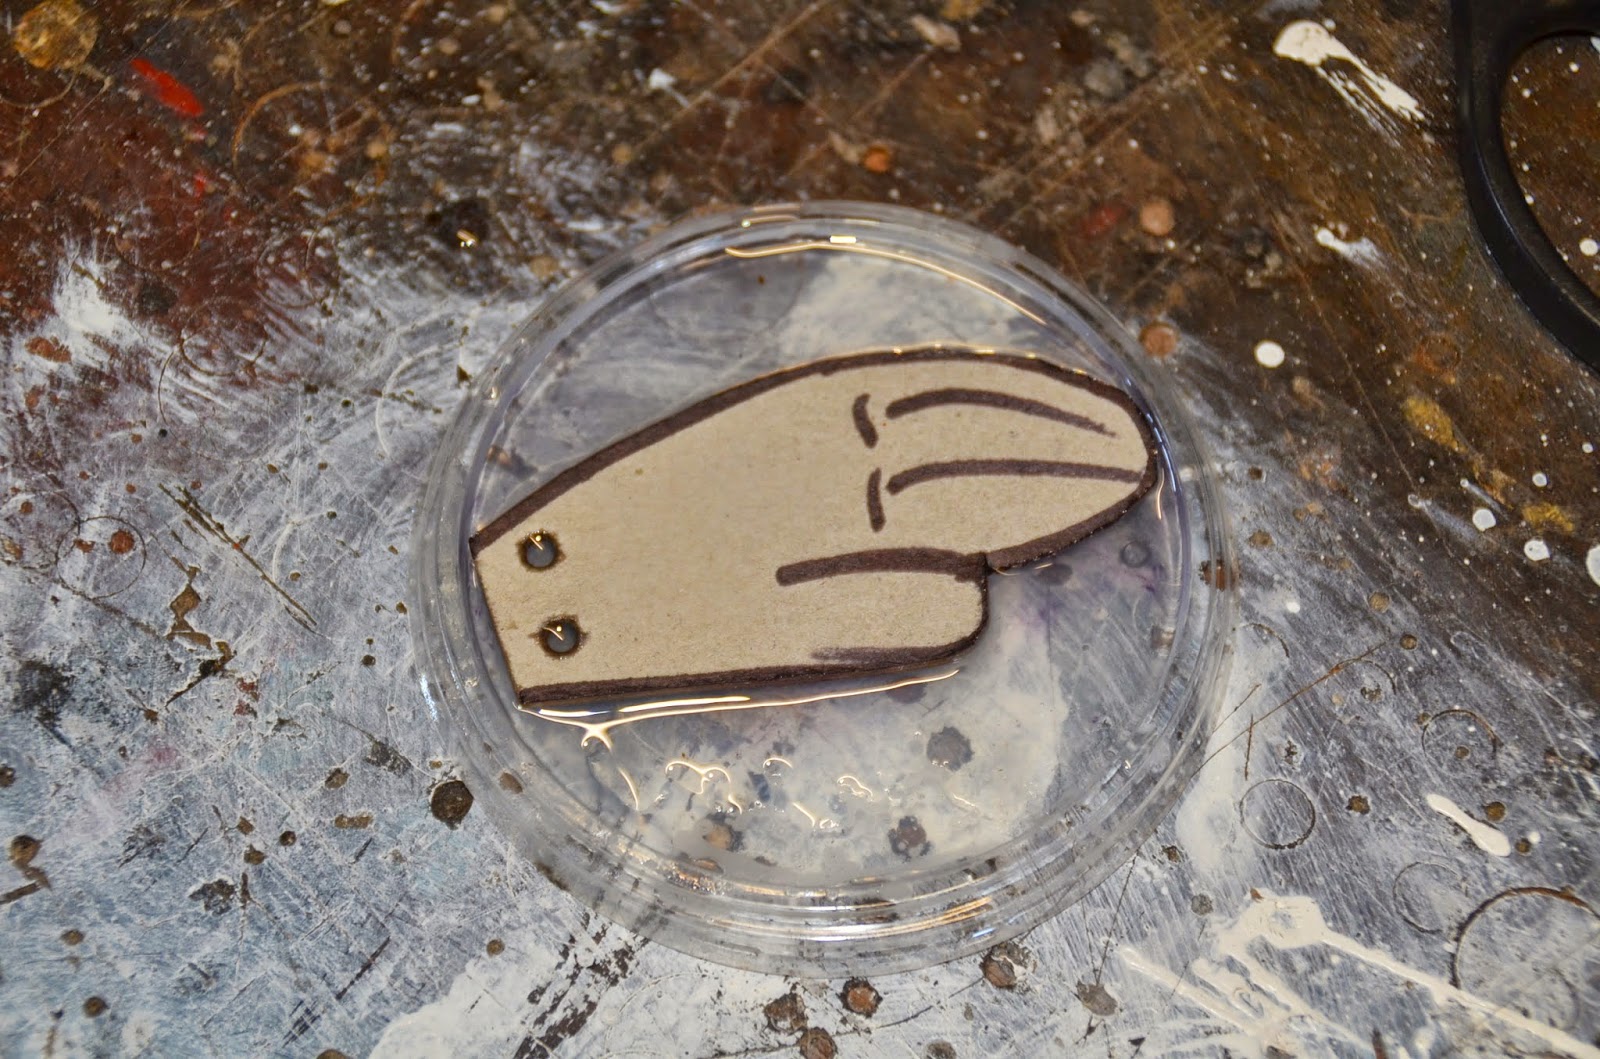
I wanted to make as many parts of the puppets the same, mainly due to the time constraints on the project but also as a unifying detail overall. Thick cardboard was used to make the hands and feet but it was quite soft and porous. This is where that wonderful stuff Super Glue comes into its own. It is great for sealing and strengthening materials like this cardboard. Here is a hand being dunked into a puddle of glue, then being hung in a row to drip and dry.


This shows a nearly complete puppet and his mate the Red Devil. Their torsos are fabric tubes from socks, stuffed with plastic bags (they are much softer than scrunched newspaper), which were sewn and turned over at the tops to tighten them up.
The legs and arms were sewn roughly but securely and each stitching joint was treated with super glue as per the limbs.


This puppet became everybody's favourite as it couldn't be placed anywhere without displaying a whole lot of attitude. I made the hair by stretching a small black sock over the back of her head, tying it off tightly with a rubber band, stitching the front down at three places and coming up with a cute widow's peak.
She was out there and away!


While making the group, I thought I would like to have at least one token zombie but that meant two different sized protuberant eyes and a gaping mouth - could it be done?
The eyes are half a table tennis ball and a section of a spare small styro ball. I tried to glue them overnight with PVA held in place with tape, but the larger one didn't stick, so back to the super glue. This had a bit of an eating effect on the foam but it held it in place that's all that mattered.
Once the eyes were in place I cut into the sock and newspaper to make the mouth. The problems I thought I would have didn't occur and I was able to carve out a sizeable mouth. This was sealed with super glue then a layer of Selley's Kneadit was added.
Teeth, made of shaped thick plastic,. were inserted in slots cut into the hard Kneadit with a motor tool.


Apart from a few minor additions, this is the final look of the group. Can you see what I mean about the pony tail girl? Zombie boy, wearing his favourite tie, is up the top with his mate the Red Devil, while Let's Get Physical is on the left gazing down at Gormless (who just doesn't get him - or life), while the original Baron Samedi (he gets a top hat at the last minute) decides to take advantage of his situation and stretches his considerable arms around both girls.


Now just because I started this project, that doesn't mean I did it all. This happy group of Trivia goers spent a lovely evening in front of the TV, stitching on hands, feet and limbs while eating fish and chips and watching Australia beat New Zealand in the Anzac Rugby League test.

See what I mean about Gormless? Staring off into space, totally oblivious to the whole world apart from the fact that she has really cool hair.