Monday, 19 January 2015

Ork Racer Part2


This entry is all about the building of the racers themselves.As was mentioned in the previous entry, I  used two spare tank turrets from Trumpeter kits for the bodies of the vehicles, but they needed a good deal of modification before use by Orks. The one on the right is unchanged except for a layer of kit armour, while that on the left has been drilled, hollowed  and fitted out with a rough cockpit and a much larger gun.


All grey parts are original kit, while white is the colour of sheet styrene. The shape of the cockpit is neither here nor there at this stage, as the actual driver will determine the final look of this aspect of the build.


One overriding factor governs these types of build and that is, "leave no surface untouched". I really wanted to see a big bulging differential hump on these buggies, so it had to be made. Apart from the wheels this would be a cast item (Ike's brief). Here we see the black plastic master, the pink silicon mould and the final casting. At this point the second cast has not been removed.


Each vehicle needed a ventral structure to complete its chassis and they were made with simple boxed forms from styrene. This plastic sheet is the perfect modelling material in that it is made in various thicknesses, can be cut by scoring and snapping, glues using a solvent or super glue and takes paint well, either acrylic or enamel. On the left you can see a piece of Evergreen styrene L beam which has been used to reinforce the edges of the box. Evergreen makes such extrusions in many useful shapes including tubes, rods, U forms, I beams, flats and sheets.
 

Now the fun starts, cluttering up the surfaces with whatever you can think of. Here I can see electronic items, lead solder, kit parts, that resin diff, lead sheet, a cut styrene Ork symbol and many, many rivets cut from styrene rod.


Each vehicle represents a similar buggy type but owned by two different Ork clans. This being the case they have to be individually outfitted. On the right is a high rider of the Blood Axe clan while the other is a low rider of the Bad Moons.

 
 I always detail the undersides even though they may be invisible once the final placement is made.


Here can be see the cast hemispheres used as hubs for the low rider's wheels. They had to ground to fit the space but really they weren't planned at all. I had originally decided to have a differential hump, but found that there really wasn't enough room and so they became these groovy wheel supports. The fuel tanks were tubes cut and fitted with circles made with a cheap punch kit.


This is the Bad Moons low rider almost complete before painting. There is a bit of work to be done on the upper surface  when the driver makes his entrance. I am particularly pleased with the exhausts and the use of some great stainless steel swarf (curled debris from lathe work). This was used as hydraulic lines feeding the complex front ends. 


And here is the Blood Axe high rider complete with already red painted missiles. As cast parts are cream in colour, you can see that I have used a previously made  fuel drum on this buggy which gives it a different look from the other.


Both together and awaiting their drivers and a paint job.


Ork Racer Part 1

These are the drawings I did of the model I was going to make as a thank you to my friend Ike. He helped me to overcome my problems with the blog and I felt the best I could do in return would be to make him a special model using cast resin pieces. The vehicle was to be an Ork racer made from the turret of a KV-1 Russian
tank mounted on the most outrageous knobby wheels. This entry is about the process of making these wheels.


Above are two drawings which set out the look of the wheel, with its extravagant tread pattern and in the lower one, how it was to be made and its size.Thick plastic sheet was to be laminated after the correct sized holes were drilled.  


These photos show part of the drilling,milling and finishing of the central holes. I have no simple way of making a clean hole above a certain size, so an enlarging procedure must be used employing grinding and sanding.
 

The holes are done, now comes the gluing under the weight shown to laminate them before  they are rounded into their final circular form.


Well they look like wheels with at least two levels of depth and a central axle hole. Note how they conform to the plans. I'm amazed sometimes how things actually go to plan. Good for me.


I used thick solder to make the tread pattern and super glue to fill the undercuts that are formed by laying a circular section on to a flat. You can also see the use of epoxy to help with the larger gaps.


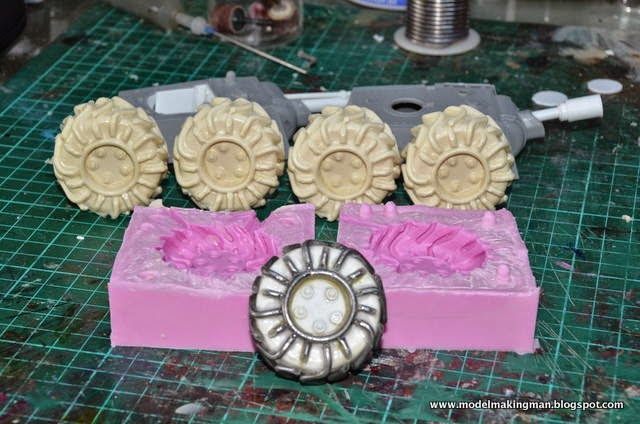
Here we see the casting process from the initial mould box to a view of the two parts of the mould, to the first cast wheel still with its pour plug in place. The final pic shows all the wheels cast, their moulds and the master in front. Behind are the tank turrets which are the subject of the next entry.


Monday, 15 December 2014

Cool Dude Zombie with Pawpaw


You must admit this is as cool a dude that a zombie ever gets and the top hat from the Clever Duck did not go astray. Hang on,yes it did, I had to make another one because the duck's was too small. Can't take a single trick!


Why isn't there a font size between these two? Anyway, what is the significance of the pawpaw? That is between me and my great neice and there it will stay but believe me, it does mean a lot.


Some details of the build from the final photos is the best I can do as my computer went from Apple to PC and the transition was not smooth. I  was not taking progress shots, I was not modelling, actually everything came to a halt while the Apple was on the blink.
The base is a grooved piece of plaster, the pawpaw is Apoxie Sculpt as are the clothes. All pretty standard stuff. I added his arms attached to the toothpick cane, as a unit, to the body after sculpting the front of his tuxedo and adding a fine chain for that extra bit of class.


He seems a bit leery of the fruit, probably never having been confronted in this manner before. Who has?


An undercoat of Citadel white for both parties.


When was the last time you saw spats or even thought about them? I could remember Uncle Scrooge McDuck wore them, so I googled"cartoon characters wearing spats" and there he was with many more besides. Amazing! Of course then it had to be" Spats" by themselves and, well it blows your mind that the rest of the fashion world is obviously wearing them and it has just passed you by.


Well there he stands,be-spatted and ultra cool while the fruit of the moment just sits quietly ripening (cleverly balanced as its pin took to the super glue just a bit too quickly).
What will happen next? They have just about the same level of intelligence,probably a standoff.


Sunday, 14 December 2014

Orc Droid final form


THIS EARLY ENTRY IS BEING RE-WRITTEN AS I INADVERTENTLY DELETED ALL 748 PHOTOS FROM MY BLOGS.

This vignette called "Unwelcome Visitor"was to be my entry into the 2011 Games Workshop Golden Daemon competition, however due to a misunderstanding regarding its inclusion and transport, it never made it to Sydney.


The above pics give an all round views of the piece and as I did not keep a detailed photo log of the build,I will be describing features as they can be seen in their final form.
 
What we basically have is an Imperial tower being visited by an Orc Droid, that is an orc warrior in a huge exoskeleton. It has been discovered by an Imperial Guardsman who is very sensibly, staying out of sight.
 
 
This was the first model I had built where I used silicon moulds and resin casting. After the bust of the Araby Ogre where I needed 12 skulls, I figured there had to be a better way of doing the same detail over and over. The tower,being Imperial, had to be ornate and skull bedecked so I decided to make two masters for the walls. The above pic shows the master, mould in pink silicon and the resin cast in cream. The master used styrene plastic, lead solder, a button battery,corrugated cardboard and a previously cast techmarine badge.


More casting here with the master in the middle made up of 5 individual skull casts joined. This set formed a frieze around the base of the building and separate skulls were used any where I felt I needed a detail.


These pics show various aspects of the building.The top shows one of the four sides of the base and this panel, although not repeated, was a casting of disparate details in one piece. You can see the use of individual skulls in the second pic as well as the frieze used in the third. Our Imperial Guard hero can also be seen in the last two pics.The second pic shows the other panel I made for the tower, still with a bit of a Mechanicum theme. 


I wanted different heights to be available to the eye,so that there would be something of interest at every level. The tower is so solid so I made the gantry above to seem flimsy and yet fit with the overarching idea. Thin pipes at the corners of the building lead to the complex top and every structure,be it a support or bracket or junction had to be thought about. People see the entirety of a model and don't think about the fact that EVERYTHING they see has to designed and then fabricated.


Here are two views which show the complexity of that roof.especially how those rising pipes join the upper dome. Yes there skulls here as well as jewels, tubes, brackets and fastenings.


Here is the bad guy. An ordinary  orc boy was put into a suit of armour which would justify a complete build description by itself but it was done some years ago that I rarely look at it anymore and am only writing about it now because I was so stupid as to delete the original blog. Suffiice it to say that I am quite proud of the bulbous burner receptacle, it looks proper mek boy mad and no self respecting Goff Nob could be upset by the righteous black and white paint job. 

I hope these photos alone convey all the detail work that goes into scratchbuilding such a scene as this.